Annotated Experiment: Microbial Whole Genome Sequencing
Sequencing whole genomes of microbial isolates
Summary: In this experiment, students used microbiology techniques to culture and isolate bacteria from soil collected in their backyards. Starting with those cultures, we sequence whole bacterial genomes.
Protocol information
Protocol Credits
- Author(s)
- Jason Williams, Cold Spring Harbor Laboratory
- Maintainer/contact: Jason Williams, Cold Spring Harbor Laboratory: email
- Last updated: March, 2025
- Source materials and references
DNA sample source
- Type: Microbial
- Collection source: Bacterial isolates cultured on LB Agar from soil.
Nanopore Sequencing
- Sequencing format: MinION
- Sequencing kit: Native Barcoding Kit 24 V14 (SQK-NBD114.24)
- Oxford Nanopore Sequencing protocol: Official ONT protocol
- Indexed/Barcoded: Yes
- Samples per run: 24 samples
Computer and Bioinformatics
- Analysis tools
- Software to download or install:
- Oxford Nanopore Software Downloads Oxford Nanopore account and login required:
- MinKNOW
- EPI2ME Desktop Application
- Other software:
- Oxford Nanopore Software Downloads Oxford Nanopore account and login required:
- Analysis difficulty: More difficult
- Command line needed: Some
- GPU/Super-high accuracy basecalling required: Yes, if possible.
Reagents
Personal protective equipment
- As recommended by original protocols (e.g., gloves, lab coat)
Sample collection and prep
- Collection and isolation of bacteria not covered in this protocol. You may fine these two articles helpful
- Bacterial Isolation
- Soil Macromorphology: Isolation of Soil Bacteria
DNA extraction
- NEB Monarch HMW DNA Tissue Kit
- Included
- Monarch HMW gDNA Tissue Lysis Buffer
- Monarch Protein Separation Solution
- Monarch gDNA Wash Buffer
- Monarch RNase A (store -20°C after opening)
- Proteinase K, molecular biology grade (store -20°C after opening)
- Elution buffer plus; see Protocol Guidance for Extraction of Ultra-High Molecular Weight (UHMW) Genomic DNA for Ultra-Long (UL) Read NGS Sequencing applications in Oxford Nanopore Technologies® workflows ]
- User-provided
- Phosphate buffered saline (PBS), cold
- Ethanol (≥ 95%)
- Isopropanol
- For Gram-negative bacteria: Lysozyme (25 mg/ml)
- For Gram-positive bacteria: STET Buffer containing Lysozyme (10 mg/ml); potentially also lysostaphin
- Triton-X
- Included
DNA quantification
- Qubit™ dsDNA Quantification Assay - High Sensitivity
- Included
- Qubit™ dsDNA HS buffer
- Qubit™ dsDNA HS standard #1
- Qubit™ dsDNA HS standard #2
- Included
DNA prep, library creation, and sequencing
- Nanopore kit
- Included
- DNA Control Sample (DCS)
- Native Adapter (NA)
- Sequencing Buffer (SB)
- Elution Buffer (EB)
- AMPure XP Beads (AXP)
- Long Fragment Buffer (LFB)
- EDTA (EDTA)
- Flow Cell Flush (FCF)
- Flow Cell Tether (FCT)
- Native Barcode plate (NB01-24)
- User-provided
- NEB Blunt/TA Ligase Master Mix (NEB, M0367)
- NEBNext FFPE Repair Mix (NEB, M6630)
- NEBNext Ultra II End repair/dA-tailing Module (NEB, E7546)
- NEBNext Quick Ligation Module (NEB, E6056)
- Nuclease-free water (e.g. ThermoFisher, AM9937)
- Freshly prepared 80% ethanol in nuclease-free water
- Bovine Serum Albumin (BSA) (50 mg/ml) (e.g Invitrogen™ UltraPure™ BSA 50 mg/ml, AM2616)
- Included
Equipment and consumables
Lab equipment
- PCR thermocycler
- Microcentrifuge (20,000 x g)
- Micropipette set (e.g., P10, P100, P1000)
- Assorted tube racks (microfuge and PCR tubes)
- Magnetic rack for 1.6-1.7ml tubes
- Ice bucket with ice
- Qubit™ fluorometer
- Permanent markers
- (Optional) Thermal mixer containing a 1.5 ml tube block
- (Optional) Vertical rotating mixer/Hula mixer
- (Optional) Rotor-stator homogenizer
- (Optional) Vortexer
- (Optional) Microplate centrifuge, e.g. Fisherbrand™ Mini Plate Spinner Centrifuge (Fisher Scientific, 11766427)
Consumables
- NEB Monarch HMW DNA Tissue Kit
- Included
- Monarch DNA capture beads
- Monarch bead retainers
- Monarch 2 ml tubes
- Monarch spin collection tubes
- Included
- Qubit™ dsDNA Quantification Assay - High Sensitivity
- Included
- Qubit™ assay tubes
- Included
- Micropipette tips (e.g., P10, P100, P1000)
- 1.5-1.7ml microfugue tubes
- 0.2 ml thin-walled PCR tubes
- (Optional) wide-bore 1000ul pipette tips
- (Optional) 1ml syringes and 25G blunt needles
- (Optional) 1.5 ml Eppendorf DNA LoBind tubes
- (Optional) Eppendorf twin.tec® PCR plate 96 LoBind, semi-skirted (Eppendorf™, cat # 0030129504) for working with 24 or more samples.
Nanopore sequencing equipment
- Sequencing device: MinION sequencer (M1kB,C, or D)
Computer equipment
- Desktop or laptop with MinKNOW and EPI2ME installed
Estimated timings
- DNA extraction: 90-120 minutes + elution time (1-24 hours)
- DNA quality control, and library prep:
- Quality control: 10 min (Qubit); 60-75 min (if using electrophoresis)
- Library prep: 90-120 min
- Sequencing: 24-72 hours
- Data analysis: Varies (a few hours)
Microbiology Safety Protocols
We recommend reviewing ASM Guidelines for Biosafety in Teaching Laboratories when working with bacterial cultures.
Background
Playlist: Nanopore Sequencing: Microbial Isolates
Sequencing microbial isolates offered students a hands-on opportunity to explore the rich biodiversity of bacteria in their own environment—and potentially uncover organisms with important applications. In fact, many novel antibiotics, including those effective against drug-resistant pathogens, have been discovered by sequencing bacteria isolated from soil samples (Terramycin was the blockbuster antibiotic that Pfizer discovered in soil samples). At the 2024 DNA Learning Center Sequence-a-Genome camp, high school students participated in an exciting experiment involving the sequencing of bacterial samples collected from their own backyard soil samples. Students extracted DNA from each isolate and generated long-read sequence data to identify, characterize, and compare the microbes they discovered. This project connected cutting-edge genomics to real-world challenges in medicine and biotechnology, all starting from the ground beneath their feet.
Additional Reading
- Oxford Nanopore R10.4 long-read sequencing enables the generation of near-finished bacterial genomes from pure cultures and metagenomes without short-read or reference polishing: paper
- Sequencing and analysis of nanopore-only microbial isolates with the NO-MISS workflow: video
- Isolation and Screening of Soil Bacteria as a Source of Novel Antibiotics: video
DNA Isolation (Part I) — Lysis and precipitation
Goal: Lyse bacterial cells and precipitate high molecular weight DNA.
Instruction tip
Each student (up to 24) can prepare their own sample. If handling bacterial samples is undesirable, it may be possible to prepare lysates to the precipitation step. Appropriate safety protocols should still be observed.
References
This DNA extraction protocol follows Protocol for High Molecular Weight DNA (HMW DNA) Extraction from Bacteria (NEB #T3060) and Protocol for UHMW DNA Cleanup in the Oxford Nanopore Technologies® UL Library Prep Workflow; both from New England Biolabs.
NEB has published the following overview of the Monarch® HMW DNA Extraction Kit workflow; keep in mind the timing they suggest will likely be much different in a classroom setting.
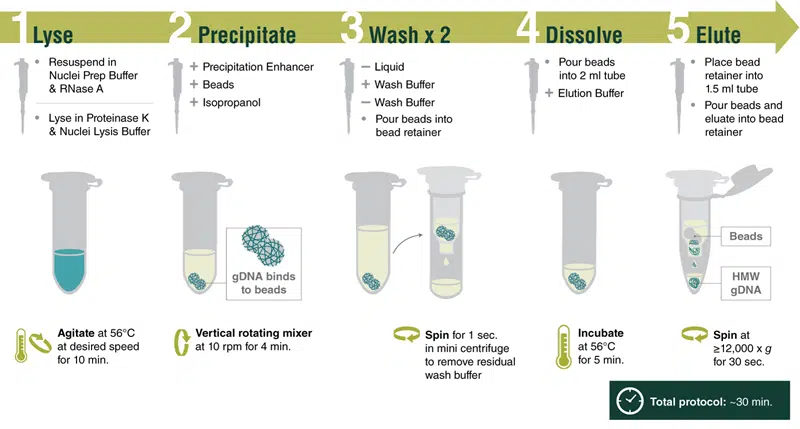
Bacterial lysis
Cell count and Gram classification
Cell input
Depending on how many cells you have, your sample may be low input or standard input. This classification depends on the type of bacteria and NEB provides guidelines for E.coli (standard: 1 x 10⁹ – 5 x 10⁹ cells; low: 5 x 10⁸ – < 1 x 10⁹ cells )and B.Cerus (low: 2 x 10⁸ – 4 x 10⁸ cells). See How to quantify bacterial cultures - From CFU and OD to counting chamber for tips on estimation.
Gram staining
If possible, you should determine the Gram classification of your samples. See Gram Stain Protocols from the American Society for Microbiology. If you are unsure you will have to work by trial and error. We recommend following the Gram negative protocol and observing carefully the efficency of your lysis.
-
Pellet bacterial cells in a Monarch Pestle Tube by centrifugation at maximum speed (> 12,000 x g) for 1 minute.
-
Follow the appropriate lysis protocol depending on the type of bacteria:
a. Resuspend pellet in 300 µl (Low Input: 150 µl) cold PBS. Cold TE or Tris buffer may be used in place of PBS if preferred.
b. Add 10 µl Lysozyme (25 mg/ml, not provided) and mix by vortexing briefly.
c. Add 300 µl (Low Input: 150 µl) HMW gDNA Tissue Lysis Buffer to the sample and mix by inverting 5-10 times.
d. Incubate at 37°C in a thermal mixer with agitation at the desired speed or incubate in a bath or heatbock ocassionally inverting to mix. The speed of the thermal mixer influences fragment length and lysis time. For most applications, maximum agitation speed (1400–2000 rpm) is recommended. For maximum gDNA size, agitate at 500 rpm. Incubation is complete when lysate turns clear, which is approximately 3–5 minutes for E. coli. At 500 rpm, lysis may take longer.
Tip
Thorough mixing is essential, especially with viscous samples.
a. Resuspend pellet in 300 µl (Low Input: 150 µl) of an appropriate lysis buffer containing a lytic enzyme and mix by vortexing briefly. STET buffer with freshly added lysozyme (10 mg/ml) works well for some Bacillus species.
b. Incubate at 37°C for 30 minutes (no agitation).
c. Add 300 µl (Low Input: 150 µl) HMW gDNA Tissue Lysis Buffer to the sample and mix by inverting 5–10 times.
-
If working with a single thermal mixer, increase the temperature to 56°C. Following lysozyme treatment at 37°C, increase the temperature of the block in the thermal mixer to 56°C.
-
Add 20 µl (Low Input: 10 µl) of Proteinase K and mix by inverting 10–20 times.
-
Homogenization can be carried out using one of two methods, depending on the desired gDNA size: in a thermal mixer or with a rotor-stator homogenizer. If using a rotor-stator homogenizer, the sample must be in a 2 ml tube (not provided).
a. Incubate at 56°C for 30 minutes in a thermal mixer at the desired speed. The speed of the thermal mixer influences fragment length and lysis; higher agitation speeds reduce DNA size and sample lysis time. For most applications, including the standard ligation-based Oxford Nanopore Technologies (ONT) sequencing protocols, maximum agitation speed (1400–2000 rpm) is recommended to produce DNA fragments predominantly 50–250 kb.
To achieve maximum gDNA size, up to the Mb range, use a low agitation speed. Agitation at speeds < 500 rpm is not recommended as gDNA will be significantly tangled, which reduces the efficiency of protein removal in later steps. This tangled DNA is also difficult to dissolve during lysis and elution and can result in visible DNA aggregates.
a. Within a 2 ml tube, insert the tip of the homogenizer probe and turn on to the lowest setting. Homogenize 5–15 seconds; stop when foam begins to form in the lysate. Additional homogenization may be required to reach optimal gDNA size. gDNA size can be verified by pulsed field gel electrophoresis or FEMTO Pulse. Rotor-stator homogenizers may run at higher speeds after extended use; reduce homogenization time if necessary.
a. A low-cost substitute for the homogenizer, you can pass the sample through a 25G needle. Draw up and expel the bacterial lysate 5-10 times. You will have to characterize by trial and error your fragment size. Samples may be very viscous; you may shear with a pipette first.
Sharps Safety
Because the use of sharpes is involve, extra caution is advised. You can skip this step all together if you do not have other options.
-
Add 10 µl (Low Input: 5 µl) of RNase A and mix by inverting 5–10 times. Incubate for 10 minutes at 56°C with agitation in a thermal mixer at the speed used in Step 5. If you are not using a thermal mixer, incubate at 56°C with ocassional agitation by hand.
-
Change the heat block in the thermal mixer to accommodate a 2 ml tube, and preheat the block to 56°C. If a 2 ml tube block is not available, continue working with the 1.5 ml block.
-
Add 300 µl (Low Input: 150 µl) of Protein Separation Solution. Mix by inverting for 1 minute. Alternatively, a vertical rotating mixer at 20 rpm can be used.
-
Centrifuge for 10 minutes at 16,000 x g. If working with multiple samples, during centrifugation, prepare the plastics for Part 2, as indicated in the following step. The sample will separate into a large, clear upper phase (DNA) and a lower, clear phase (protein, usually on the bottom of the tube, but occasionally floating). There may also be a white precipitate at the bottom of the tube. Additional centrifugation time (10-20 minutes) may be required for complete phase separation, particularly when low agitation speeds were used.
-
If working with multiple samples, prepare and label the plastics for the upcoming steps. Each sample will require:
- Monarch Collection Tube II (no need to label)
- 1 Monarch Bead Retainer inserted into the collection tube; this will be used to remove the wash buffer from the gDNA bound to the beads.
- 2 Monarch 2 ml Tubes; one for phase separation and one for elution.
- 1 1.5 ml microfuge tube (DNA low bind recommended, not provided); this will be used to collect the eluate.
-
Using a 1000 µl (Low Input: 200 µl) wide-bore pipette tip, transfer the upper phase containing the DNA (large, clear phase) to a labeled Monarch 2 ml Tube. A substantial fraction of HMW DNA will be located at the interface between the clear upper phase and the protein phase; highest yields will be achieved by transferring as much of the upper phase as possible. Using a 200 µl wide-bore pipette tip to transfer the final volume of the upper phase is recommended for maximum yield. Avoid transferring material from the protein layer, though a small amount (1–2 µl) will not be detrimental. If protein enters the pipette tip, gently push it back into the tube. If a lower protein phase is not visible, leave ~30 µl behind to ensure protein is not carried over. Typically, the transferred volume will be ~ 800 µl (Low Input: ~400 µl). If the volume of the sample is < 700 µl (Low Input: < 350 µl), adjust the volume of isopropanol used in Step 2 of Part 2: HMW gDNA Binding and Elution to 0.7 volumes.
Pause point
If needed, you could keep samples at 4°C before precipitation with isopropanol in the next step.
DNA Isolation (Part II) — Binding and elution
Goal: Bind the high molecular weight DNA to the Monarch glass beads and elute and solubilize the DNA.
-
Using clean forceps, add 2 DNA Capture Beads to each sample, which should be contained in a Monarch 2 ml Tube.
-
Add 550 µl (Low Input: 275 µl) isopropanol, close the cap, and mix on a vertical rotating mixer at 10 rpm for 5 minutes to attach DNA to the beads. If a vertical rotating mixer is not available, invert slowly and gently by hand 25–30 times. A manual inversion is complete when the tube returns to the upright position. Slow inversion is critical for the DNA to bind to the beads; each full inversion should take ~5–6 seconds. If necessary, flick the tube to release any beads that stick to the bottom of the tube.
- After a 2–3 inversions, the solution becomes more viscous and the DNA will wrap loosely around the beads. During the following inversions, precipitation of gDNA may be visible, especially with larger input samples. The DNA complex will often contain small air bubbles. With increasing number of inversions, the DNA will completely wrap around the beads, often causing the beads to stick together. DNA binding to the beads should be complete after 25–30 inversions, and the solution should no longer be viscous. Additional inversions may be necessary for larger input samples.
-
Remove and discard liquid by pipetting. Avoid removing any of the gDNA wrapped around the glass beads. For optimal DNA solubility, avoid letting the bound DNA dry out on the beads during this and the following steps; add the next buffer quickly. There are two suggested options for carrying out this step:
- Keeping tube upright, insert pipette tip and gently push beads aside to remove liquid.
- Angle the tube so that beads remain at the bottom, and liquid reaches toward tube opening. Pipette from the liquid surface and continue to angle as liquid is removed (tube will be almost horizontal at the end).
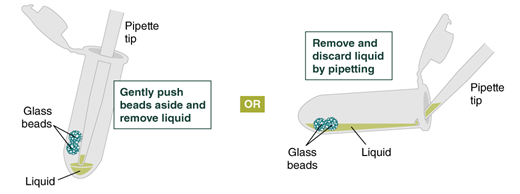
Figure on liquid removal—from NEB protocol
-
Add 500 µl gDNA Wash Buffer, close the cap, and mix by inverting the tube 2–3 times. Remove the gDNA Wash Buffer as described in step 3. The loose gDNA complex will condense around the beads more tightly.
-
Repeat the wash in Step 4 and remove the gDNA Wash Buffer by pipetting. Alternatively, the buffer can be removed by decanting: position a pipette tip at the top of the angled tube to prevent the beads from falling out. It is not necessary to remove all the gDNA Wash Buffer at this point.

Figure on liquid removal—from NEB protocol -
Place a labeled bead retainer into a Monarch Collection Tube II. Pour the beads into the bead retainer and close the cap. Discard the used Monarch 2 ml Tube. When working with multiple samples, be sure to close the cap of the bead retainer after each transfer of beads.
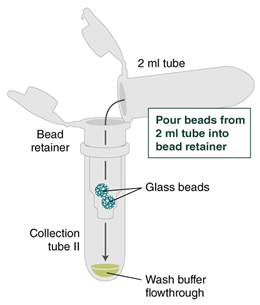
Figure on bead removal—from NEB protocol Optional
Optional bead binding workflow
In Protocol Guidance for Extraction of Ultra-High Molecular Weight (UHMW) Genomic DNA for Ultra-Long (UL) Read NGS Sequencing applications in Oxford Nanopore Technologies® workflows, the following steps are suggested:
The following alternative bead binding workflow is an option for experienced users looking for improved sequencing metrics. Invert the sample via slow manual inversion (~5 seconds per full inversion). Stop inverting once the DNA forms a loose “jelly” around the beads and the viscosity of the solution has returned to normal levels. This usually takes 20-25 inversions for cell and blood samples, and ~40 inversions for tissue samples. By keeping the DNA in this loose form, it is less compact and will therefore go into solution easier at the end of the purification process, leading to better results during the library prep and sequencing. However, when removing the supernatant after bead binding, care should be taken not to remove part of the DNA jelly, as it can easily slip into the pipette tip. If necessary, leave some of the liquid behind.
Upon adding the wash buffer, the DNA “jelly” will contract tighter around the beads and the sample will be easier to handle. Do not spin the beads to dry them after the wash when using this alternative workflow, as some DNA may detach from the beads. Instead, pour the beads containing the loose DNA complex into the bead retainer and tap the bead retainer gently on absorbent paper to remove traces of wash buffer. The DNA will not be completely dried, but that is not necessary at this stage; it will lead to better solubility upon elution. Do not expose the DNA to air longer than necessary; after tapping, pour the beads immediately into the elution buffer EB+, and return the empty bead retainer into the collection tube. Spin briefly in a benchtop minifuge to remove traces of wash buffer from the bead retainer walls. The dried bead retainer can now be placed in the DNA low bind tube that is required for the elution step.
Elution
Using the elution buffer-Triton mix (EB+) instead of Monarch Elution Buffer II results in better UL library prep and sequencing results. Instructions for formulating this mix are provided in “Important Notes Before Extraction.”
After the washes and dry spinning step, the following steps should be employed for elution:
-
Immediately pour the dried beads into the 2 ml tube with the pre-aliquoted elution buffer-Triton Mix (EB+).
-
Incubate 10 minutes at 56°C to elute the DNA off the beads. To facilitate elution during incubation, gently pipette and dispense the eluate a few times over the glass beads using a wide bore pipette tip; ensure that the DNA has been released from the beads (the viscosity of the eluate will increase).
-
If time is not limiting, let the eluate sit for at least 1 hour or overnight on the beads at room temperature before proceeding with the next step. This will improve elution efficiency and support effective resuspension of the UHMW DNA.
-
Pour the beads with the elution buffer into the bead retainer sitting in a DNA low bind 1.5 ml tube.
-
Centrifuge for 1 minute at maximum speed (>16,000 x g). Check if DNA was completely released from the beads. If after the spin DNA threads are visible between beads and eluate, centrifuge for 1 additional minute at max speed.
-
Using a wide bore pipette tip, carefully pipette eluate up and down 5 times for homogenization and incubate the samples for 5-10 minutes at 37°C. If needed, repeat the careful pipetting several times to resuspend the DNA. Store at 4°C or continue with dilution and resuspension guidance below.
UHMW DNA Dilution & Resuspension for Library Preparation
Samples should be further diluted to reach the optimal concentration for UL library preparation. Dilution should be done with the elution buffer-Triton mix that was used for elution, following the guidance below:
-
Add 560 µl elution buffer-Triton mix (EB+) to the sample to bring the total volume to 760 µl. Use 185 µl if working with MinION flow cells, for a total volume of 385 µl.
-
Pipette up and down 5-10 times using a P1000 wide-bore tip to resuspend the DNA.
-
Incubate the samples for 5-10 minutes at 37°C.
-
Repeat the steps 2 and 3 one or two times if samples do not appear homogeneous. Samples can be kept overnight at room temperature to support homogenization of the UHMW DNA or can be stored at 4°C. Once homogenized, take a 10 µl aliquot for quantitation2. Make sure DNA is well dissolved and no DNA clots are visible before proceeding with the Ultra Long library prep, Part 3 - Library Preparation. It is important to note that allowing the DNA at least 1 day to go into solution completely and “relax” typically leads to better library prep results.
-
-
Pulse spin (≤ 1 second) the sample in a benchtop minicentrifuge to remove any residual wash buffer from the beads.
-
Separate the bead retainer from the collection tube, pour the beads into a new, labeled Monarch 2 ml Tube, and insert the used bead retainer into the labeled 1.5 ml microfuge tube (DNA low bind recommended, not provided) for later use during elution. Discard the used collection tube.
-
Immediately add 100 µl Elution Buffer II onto the glass beads and incubate for a minimum of 5 minutes at 56°C in a thermal mixer with agitation at the lowest speed (300 rpm). Halfway through the incubation, ensure the beads are not stuck to the bottom of the tube by tilting the tube almost horizontally and gently shaking. This ensures that the beads can move freely, allowing for optimal release of the DNA from the beads. It also ensures that the lower bead does not stick to the bottom of the tube during the following transfer step. Elution volume can be reduced to as low as 50 μl without affecting recovery. However, if using < 100 μl, the gentle shaking of the sample should be done several times during the incubation to ensure complete wetting of the beads.
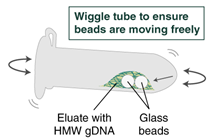
Figure capturing DNA on beads—from NEB protocol -
Ensure the bead retainer is inserted into the 1.5 ml microfuge tube. Pour the eluate and the glass beads into the bead retainer and close the cap. When working with more than 1 sample, it is important to close the cap after each transfer of beads. Typically, all the eluate flows into the bead retainer upon pouring. If any volume remains in the 2 ml tube, spin briefly and transfer.
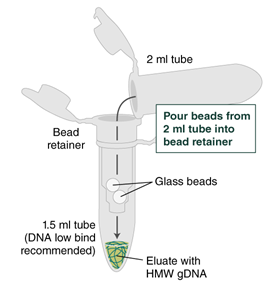
Figure eluting DNA from beads—from NEB protocol -
Centrifuge for 30 seconds at 12,000 x g to separate the eluate from the glass beads. Discard the beads and retainer.
-
Pipette eluate up and down 5–10 times with a wide bore pipette tip and ensure any visible DNA aggregates are dispersed. Before analysis or downstream use, HMW DNA must be homogeneously dissolved. After pipetting, incubate at 37°C for 30-60 minutes, overnight at room temperature, or for > 24 hours at 4°C. Pipette up and down 5-10 times again before analyzing or using the HMW DNA. Samples processed using low agitation speeds during lysis will require additional time to fully dissolve. See additional guidance in “Homogenization of HMW DNA Samples”. Samples can be stored at 4°C for short term use (weeks), or at -20°C for long term storage. The elution buffer (10 mM Tris, pH 9.0, 0.5 mM EDTA) is formulated for long term storage of gDNA.
DNA quantification with Qubit™
Goal: Determine the yeild of your DNA extraction.
References
This protocol is from the Themofisher manual.
-
Set up and label the required number of Qubit™ tubes for standards and samples. The Qubit™ dsDNA HS Assay requires 2 standards.
-
Use the provided assay tubes.
-
Use the working solution to prepare the standards and samples as follows:
Standard Assay Tubes User Sample Assay Tubes Volume of working solution 190 μL 180–199 μL Volume of standard 10 μL — Volume of user sample — 1–20 μL Total volume in each assay tube 200 μL 200 μL We recommend using 1-2 μL of the prepared library.
-
Vigorously vortex for 3–5 seconds. Be careful not to create bubbles
-
Allow all tubes to incubate at room temperature for 2 minutes, then proceed to read standards and samples
-
On the Home screen, touch dsDNA, then select dsDNA High Sensitivity as the assay type. Touch Read standards to proceed.
Note
If you have already performed a calibration for the selected assay, the instrument prompts you to choose between reading new standards and running samples using the previous calibration. If you want to use the previous calibration, skip to step 8. Otherwise, continue with step 6.
-
Insert the tube containing Standard #1 into the sample chamber, close the lid, then touch Read standard. When the reading is complete (~3 seconds), remove Standard #1.
-
Insert the tube containing Standard #2 into the sample chamber, close the lid, then touch Read standard. When the reading is complete, remove Standard #2.
Note
The instrument displays the results on the Read Standards screen. For information on interpreting the calibration results, refer to the Qubit™ 4 Fluorometer User Guide.
-
Touch Run samples.
-
On the assay screen, select the Sample volume and units.
a. Touch the + or – buttons on the wheel, or anywhere on the wheel itself, to select the sample volume added to the assay tube (1–20 μL).
b. From the Unit dropdown menu, select the units for the output sample concentration.
-
Insert a sample tube into the sample chamber, close the lid, then touch Read tube. When the reading is complete (~3 seconds), remove the sample tube. The top value (in large font) is the concentration of the original sample and the bottom value is the dilution concentration. For information on interpreting the sample results, refer to the Qubit™ 4 Fluorometer User Guide.
-
Repeat step 11 until all samples have been read.
Nanopore
Complete a flow cell check to assess the number of pores available. This should be done on the day you plan to load the library.
Library Preperation — DNA end repair and barcoding
Goal: Prepare DNA ends and attaching barcode sequences.
Nanopore
This protocol follows the MinION version of Ligation sequencing gDNA - Native Barcoding Kit 24 V14 (SQK-NBD114.24) from Oxford Nanopore.
Oxford Nanopore's protocol provides the following overview of the library preparation workflow.

DNA repair and end-prep
Note
For samples containing long gDNA fragments, we recommend using wide-bore pipette tips for the mixing steps to preserve the DNA length.
-
Thaw the AMPure XP Beads (AXP) and DNA Control Sample (DCS) at room temperature and mix by vortexing. Keep the beads at room temperature and store the DNA Control Sample (DCS) on ice.
-
Prepare the NEBNext FFPE DNA Repair Mix and NEBNext Ultra II End Repair / dA-tailing Module reagents in accordance with manufacturer’s instructions, and place on ice.
Tip
For optimal performance, NEB recommends the following:
a. Thaw all reagents on ice.
b. Flick and/or invert the reagent tubes to ensure they are well mixed.
Note
Do not vortex the FFPE DNA Repair Mix or Ultra II End Prep Enzyme Mix.
c. Always spin down tubes before opening for the first time each day.
d. The Ultra II End Prep Buffer and FFPE DNA Repair Buffer may have a little precipitate. Allow the mixture to come to room temperature and pipette the buffer up and down several times to break up the precipitate, followed by vortexing the tube for 30 seconds to solubilise any precipitate.
Note
-
It is important the buffers are mixed well by vortexing.
-
The FFPE DNA Repair Buffer may have a yellow tinge and is fine to use if yellow.
Warning
-
Do not vortex the NEBNext FFPE DNA Repair Mix or NEBNext Ultra II End Prep Enzyme Mix.
-
It is important that the NEBNext FFPE DNA Repair Buffer and NEBNext Ultra II End Prep Reaction Buffer are mixed well by vortexing.
-
Check for any visible precipitate; vortexing for at least 30 seconds may be required to solubilise any precipitate.
-
-
Dilute your DNA Control Sample (DCS) by adding 105 µl Elution Buffer (EB) directly to one DCS tube. Mix gently by pipetting and spin down.
Tip
-
One tube of diluted DNA Control Sample (DCS) is enough for 140 samples. Excess can be stored at -20°C in the freezer.
-
We recommend using the DNA Control Sample (DCS) in your library prep for troubleshooting purposes. However, you can omit this step and make up the extra 1 µl with your sample DNA.
-
-
In clean 0.2 ml thin-walled PCR tubes (or a clean 96-well plate), prepare your DNA samples:
-
For >4 barcodes, aliquot 400 ng per sample
-
For ≤4 barcodes, aliquot 1000 ng per sample
-
Make up each sample to 11 µl using nuclease-free water. Mix gently by pipetting and spin down.
-
Combine the following components per tube/well; Between each addition, pipette mix 10 - 20 times;
✓ Reagent Volume DNA sample 11 µL Diluted DNA Control Sample (DCS) 1 µL NEBNext FFPE DNA Repair Buffer 0.875 µL Ultra II End-prep Reaction Buffer 0.875 μL Ultra II End-prep Enzyme Mix 0.75 μL NEBNext FFPE DNA Repair Mix 0.5 µL Info
We recommend making up a mastermix of the end-prep and DNA repair reagents for the total number of samples and adding 3 µl to each well.
Classroom
You can prepare the mastermix and aliquot to students.
-
Ensure the components are thoroughly mixed by pipetting and spin down in a centrifuge.
-
Using a thermal cycler, incubate at 20°C for 5 minutes and 65°C for 5 minutes.
-
Transfer each sample into a clean 1.5 ml Eppendorf DNA LoBind tube.
-
Resuspend the AMPure XP beads (AXP) by vortexing.
-
Add 15 µl of resuspended AMPure XP Beads (AXP) to each end-prep reaction and mix by flicking the tube.
-
Incubate on a Hula mixer (rotator mixer) for 5 minutes at room temperature or agitate by hand intermittently over the duration of the incubation.
-
Prepare sufficient fresh 80% ethanol in nuclease-free water for all of your samples. Allow enough for 400 µl per sample, with some excess.
-
Spin down the samples and pellet the beads on a magnet until the eluate is clear and colorless. Keep the tubes on the magnet and pipette off the supernatant.
-
Keep the tube on the magnet and wash the beads with 200 µl of freshly prepared 80% ethanol without disturbing the pellet. Remove the ethanol using a pipette and discard.
Tip
If the pellet was disturbed, wait for beads to pellet again before removing the ethanol.
-
Repeat the previous step.
-
Briefly spin down and place the tubes back on the magnet for the beads to pellet. Pipette off any residual ethanol. Allow to dry for 30 seconds, but do not dry the pellets to the point of cracking.
-
Remove the tubes from the magnetic rack and resuspend the pellet in 10 µl nuclease-free water. Spin down and incubate for 2 minutes at room temperature.
-
Pellet the beads on a magnet until the eluate is clear and colorless.
-
Remove and retain 10 µl of eluate into a clean 1.5 ml Eppendorf DNA LoBind tube.
Tip
Dispose of the pelleted beads.
Optional
Quantify 1 µl of each eluted sample using a Qubit fluorometer.
Pause point
Take forward an equimolar mass of each sample to be barcoded forward into the native barcode ligation step. However, you may store the samples at 4°C overnight.
Library Preperation — Pooling, sequencing adapters, and cleaning
Goal: Barcode end-preped DNA and add sequencing adapters.
Native barcode ligation
-
Prepare the NEB Blunt/TA Ligase Master Mix according to the manufacturer's instructions, and place on ice:
a. Thaw the reagents at room temperature.
b. Spin down the reagent tubes for 5 seconds.
c. Ensure the reagents are fully mixed by performing 10 full volume pipette mixes.
-
Thaw the EDTA at room temperature and mix by vortexing. Then spin down and place on ice.
-
Thaw the Native Barcodes (NB01-24) at room temperature. Briefly spin down, individually mix the barcodes required for your number of samples by pipetting, and place them on ice.
-
Select a unique barcode for each sample to be run together on the same flow cell. Up to 24 samples can be barcoded and combined in one experiment.
Note
Only use one barcode per sample.
-
In clean 0.2 ml PCR-tubes or a 96-well plate, add the reagents in the following order per well; Between each addition, pipette mix 10 - 20 times.
✓ Reagent Volume End-prepped DNA 7.5 µl Native Barcode (NB01-24) 2.5 µl Blunt/TA Ligase Master Mix 10 µl Total 20 µl -
Thoroughly mix the reaction by gently pipetting and briefly spinning down.
-
Incubate for 20 minutes at room temperature.
-
Add the following volume of EDTA to each well and mix thoroughly by pipetting and spin down briefly.
Note
Ensure you follow the instructions for the cap color of your EDTA tube. EDTA is added at this step to stop the reaction.
✓ EDTA cap color Volume For clear cap EDTA 2 µl For blue cap EDTA 4 µl -
Pool all the barcoded samples in a 1.5 ml Eppendorf DNA LoBind tube.
Note
Ensure you follow the instructions for the cap colour of your EDTA tube.
✓ Volume per sample For 6 samples For 12 samples For 24 samples Total volume for preps using clear cap EDTA 22 µl 132 µl 264 µl Total volume for preps using blue cap EDTA 24 µl 144 µl 288 µl -
Resuspend the AMPure XP Beads (AXP) by vortexing.
-
Add 0.4X AMPure XP Beads (AXP) to the pooled reaction, and mix by pipetting.
Note
Ensure you follow the instructions for the cap color of your EDTA tube.
✓ Volume per sample For 6 samples For 12 samples For 24 samples Volume of AXP for preps using clear cap EDTA 9 µl 53 µl 106 µl Volume of AXP for preps using blue cap EDTA 10 µl 58 µl 115 µl -
Incubate on a Hula mixer (rotator mixer) for 10 minutes at room temperature.
-
Prepare 2 ml of fresh 80% ethanol in nuclease-free water.
-
Spin down the sample and pellet on a magnet for 5 minutes. Keep the tube on the magnetic rack until the eluate is clear and colorless, and pipette off the supernatant.
-
Keep the tube on the magnetic rack and wash the beads with 700 µl of freshly prepared 80% ethanol without disturbing the pellet. Remove the ethanol using a pipette and discard.
Note
If the pellet was disturbed, wait for beads to pellet again before removing the ethanol.
-
Repeat the previous step.
-
Spin down and place the tube back on the magnetic rack. Pipette off any residual ethanol. Allow the pellet to dry for ~30 seconds, but do not dry the pellet to the point of cracking.
-
Remove the tube from the magnetic rack and resuspend the pellet in 35 µl nuclease-free water by gently flicking.
-
Incubate for 10 minutes at 37°C. Every 2 minutes, agitate the sample by gently flicking for 10 seconds to encourage DNA elution.
-
Pellet the beads on a magnetic rack until the eluate is clear and colorless.
-
Remove and retain 35 µl of eluate into a clean 1.5 ml Eppendorf DNA LoBind tube.
Optional
Quantify 1 µl of each eluted sample using a Qubit fluorometer.
Pause point
Take forward an equimolar mass of each sample to be barcoded forward into the native barcode ligation step. However, you may store the samples at 4°C overnight.
Adapter ligation and clean-up
-
Prepare the NEBNext Quick Ligation Reaction Module according to the manufacturer's instructions, and place on ice:
a. Thaw the reagents at room temperature.
b. Spin down the reagent tubes for 5 seconds.
c. Ensure the reagents are fully mixed by performing 10 full volume pipette mixes.
Note
-
Do NOT vortex the Quick T4 DNA Ligase.
-
The NEBNext Quick Ligation Reaction Buffer (5x) may have a little precipitate. Allow the mixture to come to room temperature and pipette the buffer up and down several times to break up the precipitate, followed by vortexing the tube for several seconds to ensure the reagent is thoroughly mixed.
-
-
Spin down the Native Adapter (NA) and Quick T4 DNA Ligase, pipette mix and place on ice.
-
Thaw the Elution Buffer (EB) at room temperature and mix by vortexing. Then spin down and place on ice.
Note
Depending on the wash buffer (LFB or SFB) used, the clean-up step after adapter ligation is designed to either enrich for DNA fragments of >3 kb, or purify all fragments equally.
- To enrich for DNA fragments of 3 kb or longer, use Long Fragment Buffer (LFB)
- To retain DNA fragments of all sizes, use Short Fragment Buffer (SFB)
We recommend using the Long Fragment Buffer (LFB)
-
Thaw either Long Fragment Buffer (LFB) or Short Fragment Buffer (SFB) at room temperature and mix by vortexing. Then spin down and keep at room temperature.
-
In a 1.5 ml Eppendorf LoBind tube, mix in the following order; Between each addition, pipette mix 10 - 20 times.
✓ Reagent Volume Pooled barcoded sample 30 µl Native Adapter (NA) 5 µl NEBNext Quick Ligation Reaction Buffer (5X) 10 µl Quick T4 DNA Ligase 5 µl Total 50 µl -
Thoroughly mix the reaction by gently pipetting and briefly spinning down.
-
Incubate the reaction for 20 minutes at room temperature.
Note
The next clean-up step uses Long Fragment Buffer (LFB) or Short Fragment Buffer (SFB) rather than 80% ethanol to wash the beads. The use of ethanol will be detrimental to the sequencing reaction.
-
Resuspend the AMPure XP Beads (AXP) by vortexing.
-
Add 20 µl of resuspended AMPure XP Beads (AXP) to the reaction and mix by pipetting.
-
Incubate on a Hula mixer (rotator mixer) for 10 minutes at room temperature.
-
Spin down the sample and pellet on the magnetic rack. Keep the tube on the magnet and pipette off the supernatant.
-
Wash the beads by adding either 125 μl Long Fragment Buffer (LFB) or Short Fragment Buffer (SFB). Flick the beads to resuspend, spin down, then return the tube to the magnetic rack and allow the beads to pellet. Remove the supernatant using a pipette and discard.
-
Repeat the previous step.
-
Spin down and place the tube back on the magnet. Pipette off any residual supernatant.
-
Remove the tube from the magnetic rack and resuspend pellet in 15 µl Elution Buffer (EB).
-
Spin down and incubate for 10 minutes at 37°C. Every 2 minutes, agitate the sample by gently flicking for 10 seconds to encourage DNA elution.
-
Pellet the beads on a magnet until the eluate is clear and colorless, for at least 1 minute.
-
Remove and retain 15 µl of eluate containing the DNA library into a clean 1.5 ml Eppendorf DNA LoBind tube; dispose of the pelleted beads.
Optional
Quantify 1 µl of each eluted sample using a Qubit fluorometer.
-
Depending on your DNA library fragment size, prepare your final library in 12 µl of Elution Buffer (EB).
Fragment library length Flow cell loading amount Very short (<1 kb) 100 fmol Short (1-10 kb) 35–50 fmol Long (>10 kb) 300 ng
Note
- If the library yields are below the input recommendations, load the entire library.
- If required, we recommend using a mass to mol calculator such as the NEB calculator.
- We recommend storing libraries in Eppendorf DNA LoBind tubes at 4°C for short-term storage or repeated use, for example, re-loading flow cells between washes. For single use and long-term storage of more than 3 months, we recommend storing libraries at -80°C in Eppendorf DNA LoBind tubes.
- If quantities allow, the library may be diluted in Elution Buffer (EB) for splitting across multiple flow cells.
Depending on how many flow cells the library will be split across, more Elution Buffer (EB) than what is supplied in the kit will be required.
Pause point
Take forward an equimolar mass of each sample to be barcoded forward into the native barcode ligation step. However, you may store the samples at 4°C overnight.
Preparing and loading flow cell
Goal:Prime the flow cell and load the sequencing library.
Note
Using the Library Solution
For most sequencing experiments, use the Library Beads (LIB) for loading your library onto the flow cell. However, for viscous libraries it may be difficult to load with the beads and may be appropriate to load using the Library Solution (LIS).
-
Thaw the Sequencing Buffer (SB), Library Beads (LIB) or Library Solution (LIS, if using), Flow Cell Tether (FCT) and Flow Cell Flush (FCF) at room temperature before mixing by vortexing. Then spin down and store on ice.
-
To prepare the flow cell priming mix with BSA, combine Flow Cell Flush (FCF) and Flow Cell Tether (FCT), as directed below. Mix by pipetting at room temperature.
Note
Oxford Nanopore is in the process of reformatting our kits with single-use tubes into a bottle format. Please follow the instructions for your kit format.
- Single-use tubes format: Add 5 µl Bovine Serum Albumin (BSA) at 50 mg/ml and 30 µl Flow Cell Tether (FCT) directly to a tube of Flow Cell Flush (FCF).
- Bottle format: In a suitable tube for the number of flow cells, combine the following reagents:
✓ Reagent Volume per flow cell Flow Cell Flush (FCF) 1,170 µl Bovine Serum Albumin (BSA) at 50 mg/ml 5 µl Flow Cell Tether (FCT) 30 µl Total volume 1,205 µl -
Open the MinION or GridION device lid and slide the flow cell under the clip. Press down firmly on the priming port cover to ensure correct thermal and electrical contact.
-
Slide the flow cell priming port cover clockwise to open the priming port.
-
After opening the priming port, check for a small air bubble under the cover. Draw back a small volume to remove any bubbles:
a. Set a P1000 pipette to 200 µl
b. Insert the tip into the priming port
c. Turn the wheel until the dial shows 220-230 µl, to draw back 20-30 µl, or until you can see a small volume of buffer entering the pipette tip
Warning
Take care when drawing back buffer from the flow cell. Do not remove more than 20-30 µl, and make sure that the array of pores are covered by buffer at all times. Introducing air bubbles into the array can irreversibly damage pores.
Visually check that there is continuous buffer from the priming port across the sensor array.
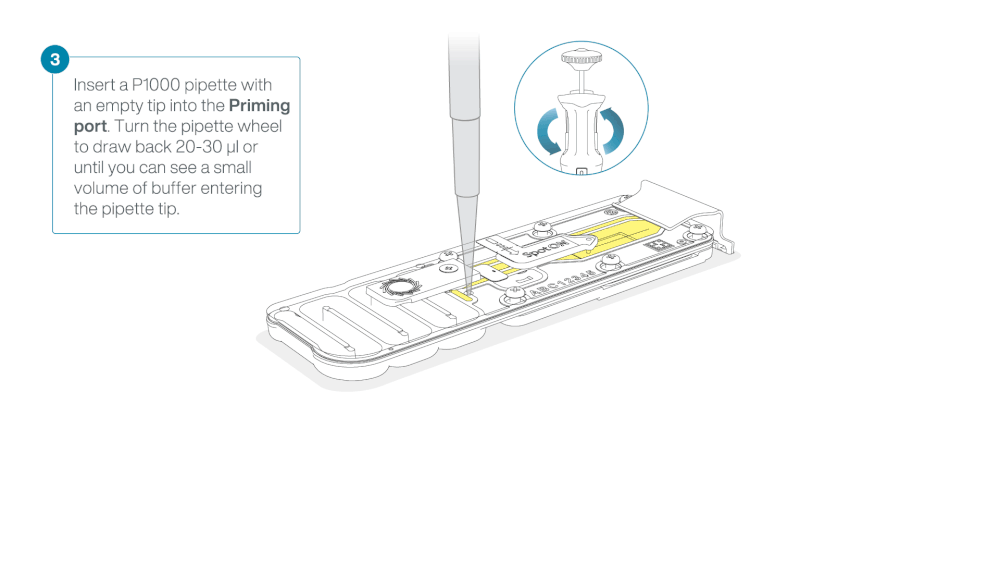
Figure demonstrating removal of buffer from flow cell—from ONT protocol -
Load 800 µl of the priming mix into the flow cell via the priming port, avoiding the introduction of air bubbles. Wait for five minutes. During this time, prepare the library for loading by following the steps below.
-
Thoroughly mix the contents of the Library Beads (LIB) by pipetting.
Tip
The Library Beads (LIB) tube contains a suspension of beads. These beads settle very quickly. It is vital that they are mixed immediately before use.
Oxford Nanopore recommends using the Library Beads (LIB) for most sequencing experiments. However, the Library Solution (LIS) is available for more viscous libraries.
-
In a new 1.5 ml Eppendorf DNA LoBind tube, prepare the library for loading as follows:
✓ Reagent Volume per flow cell Sequencing Buffer (SB) 37.5 µl Library Beads (LIB) mixed immediately before use, or Library Solution (LIS), if using 25.5 µl DNA library 12 µl Total volume 75 µl -
Complete the flow cell priming:
a. Gently lift the SpotON sample port cover to make the SpotON sample port accessible.
b. Load 200 µl of the priming mix into the flow cell priming port (not the SpotON sample port), avoiding the introduction of air bubbles.
-
Mix the prepared library gently by pipetting up and down just prior to loading.
-
Add 75 μl of the prepared library to the flow cell via the SpotON sample port in a dropwise fashion. Ensure each drop flows into the port before adding the next.
-
Gently replace the SpotON sample port cover, making sure the bung enters the SpotON port and close the priming port.
-
Place the light shield onto the flow cell, as follows:
a. Carefully place the leading edge of the light shield against the clip. Note: Do not force the light shield underneath the clip.
b. Gently lower the light shield onto the flow cell. The light shield should sit around the SpotON cover, covering the entire top section of the flow cell.
Note
Install the light shield on your flow cell as soon as library has been loaded for optimal sequencing output.
Oxford Nanopore recommends leaving the light shield on the flow cell when library is loaded, including during any washing and reloading steps. The shield can be removed when the library has been removed from the flow cell.
-
Close the device lid and set up a sequencing run on MinKNOW.
Flow cell check, mid-run check-in, and final output review
Goal: Run the flow cell using MinKNOW software.
Flow cell check
-
Navigate to the Start page and select 'Flow cell check' to open the flow cell check page.
-
When the MinION Flow Cell type and flow cell ID have been recognized, click 'Start' to begin.
Nanopore
See additional details: Flow cell check.
Sequencing run
-
Click 'Start Sequencing' on the Start page to set up the sequencing parameters for your experiment.
-
Type in the experiment name, sample ID and choose flow cell type from the drop down menu.
-
Select the kit and expansion(s) used to prepare the library. (Native Barcoding Kit 24 V14 (SQK-NBD114.24))
-
Choose your basecalling options; We recommend:
-
Fast basecalling for most situations.
-
Modified bases is off
-
-
Choose your barcoding options; should be ON.
-
Choose your alignment options; should be OFF.
-
Select the output options: We recommend
- FASTQ: Checked on
- POD5: Checked on
-
Click 'Start' to run the experiment.
Nanopore
See additional details: Starting a sequencing run on MinION Mk1B/Mk1D.
Comments and discussion
See recent comments or start a discussion on our Slack channel.