Annotated Experiment: Phage Sequencing
Sequencing Phage Genomes with Oxford Nanopore Technologies (ONT)
Summary: Students can isolate and sequence high-quality bacteriophage genomes.
Acknowledgements
We would like to acknowledge the SEA-PHAGES team, Ximena Iraheta, Michael Shamash and Corinne Maurice for their help in isolating the phages used as examples. We would also like to thank the Biology Department at Spelman College, especially Maira Goytia and Shrijeeta Ganguly, and funding source NSF through ‘Developing Foundations for Nanopore DNA Sequencing Course-based Undergraduate Research Experiences at Minority-Serving Institutions’ (Award 2215496).
Protocol information
Protocol Credits
- Authors
- James T. Melton III, Spelman College, Atlanta, GA, USA
- Kaitlyn Parrish, Spelman College, Atlanta, GA, USA
- Jordan Dotson, Spelman College, Atlanta, GA, USA
- Brenna Fox, McGill University, Montreal, Qc, Canada
- Hui-Min Chung, University of West Florida, Pensacola, FL, USA
- Patrick Lypaczewski, McGill University, Montreal, Qc, Canada
- Maintainer/contact: James T. Melton III, Spelman College: email
- Last updated: March, 2025
- Source protocols and references
DNA source material
- Type: Viral
- Collection source: Phage isolates
Nanopore Sequencing
- Sequencing format: MinION
- Sequencing kit: One of the following kits (See protocol for recommendations based on your endpoints)
- Oxford Nanopore Sequencing protocol:
- Indexed/Barcoded: Yes, 24-96 depending on kit
- Samples per run: 24-96 of samples
Computer and Bioinformatics
- Analysis tools
- Analysis difficulty: Challenging
- Command line needed: Yes
- GPU/Super-high accuracy basecalling required: Yes (Provided by the online bioinformatics platforms)
Choosing kits and formats
Depending on how many samples and students you want to process, you can either choose rapid barcoding or native barcoding with either 24 or 96 indicies. An explanation of the options are below.
| Kits | Rapid Barcoding Sequencing Kit 24 V14 (SQK-RBK114.24) or Rapid Barcoding Sequencing Kit 96 V14 (SQK-RBK114.96) | Native Barcoding Kit 24 V14 (SQK-NBD114.24) or Native Barcoding Kit 96 V14 (SQK-NBD114.96) |
|---|---|---|
| Number of genomes | Up to 24 or 96 samples can be multiplexed, depending on the chosen kit | |
| 3rd party reagents for reaction | None | Yes (Enzymes from NEB or Roche) |
| Required DNA | • 50 ng per sample for > 4 samples (5 ng/µl) • 200 ng per barcode if ≤ 4 samples (20 ng/µl) |
400 ng per sample for > 4 samples (≥36.3 ng/µl) 1000 ng per barcode if ≤ 4 samples (≥90.9 ng/µl) NOTE: 11-12 µl of a DNA sample are used during library prep. The concentrations above are ideal for sequencing; however, samples as low as 5.8 ng/µl (63.8 ng) have been sequenced successfully, even when pooled with samples prepared with the recommended amounts of DNA. |
| Application | • Entry-level CURE projects, such as identifying cluster type of isolated phages (similar but more advanced to the DOGEMS strategy in SEA-PHAGES or Science Education Alliance- Phage Hunters Advancing Genomics and Evolutionary Science) • Advanced level of CURE projects, such as phage genome annotation and genomic comparisons • Exploring phage diversity from environmental samples. |
|
| Pros | • Can be performed in class due to a shorter library prep time (estimated: 50 minutes). • No third-party reagents are required (less expensive). |
• Will allow for sequencing of the terminal ends of the phage genomes. • Long fragment buffer (LFB) allows for size selection of DNA fragments > 3000 bp. NOTE: While using the long fragment buffer might decrease the concentration of DNA, genome assembly works best with longer reads. |
| Cons | • Due to the transposase-based library preparation, the terminal ends of the phage genomes might not be sequenced. • Genomic DNA is cut randomly, which can result in shorter read sizes if the genomic extraction wasn’t done carefully. |
• Due to the lengthy process (estimated: 10-12 hours, depending on the number of samples), it is recommended that the instructor perform the library prep outside of class time; however, there are pausing points in the protocol. • Third-party reagents are required (more expensive). |
Reagents
Info
In this protocol, we will detail a phage DNA extraction, sequencing, and genome assembly, using the recommended phage isolation and DNA extraction protocols by the SEA-PHAGES (Science Education Alliance- Phage Hunters Advancing Genomics and Evolutionary Sciences) program.
Info
We organized the options in the following DNA extraction protocols into Easiest option (EO) or Lower cost (LC). For example, most labs are more familiar with spin column-based DNA extraction kits, but magnetic bead kits allow for smaller aliquoting volumes and lower costs. Similarly, purchasing magnetic racks from scientific vendors such as New England Biolabs (NEB) or ThermoFisher is generally more accessible for universities with strict purchasing policies than purchasing 3rd party supplies or 3D printing your own racks, although it can offer substantial cost savings. Additionally, we have focused our library preparation protocol on the Native Barcoding Kit 24 V14; however, the rapid barcoding kits have also been used to successfully sequence phage DNA.
References
This list assumes you are using the Promega Wizard® DNA Clean-Up System - A7280 for DNA extraction.
Personal protective equipment
- As recommended by original protocols (e.g., gloves, lab coat)
Sample collection and prep
- See Phage isolation and culturing instructions from SEA-PHAGES
DNA extraction
-
High titer phage lysates (≥ 9 x 10⁵ PFU/mL or plaque forming units per milliliter)
Tip
Medium titer phage lysates (107 - 109 PFU/mL) may provide enough DNA for sequencing.
-
Promega Wizard® DNA Clean-Up System - A7280
Tip
Several silica column kits exist from any number of competitors: Norgen Phage DNA Isolation kit or others.
- Included
- 2 ml DNA clean-up resin (Promega Wizard DNA Clean-Up Kit)
- 2 DNA clean-up columns (Promega Wizard DNA Clean-Up Kit)
- User-provided. Optional reagents were used here
- Nuclease mix - preparation instructions:
- DNase 1
- RNase A
- NaCl
- Glycerol
- ddH2O
- 80 % isopropanol, freshly prepared
- 3 ml syringes
- Proteinase K (20 mg/ml) and SDS (10%) (optional)
- 0.5 M EDTA (optional)
- ddH2O pre-warmed (95 °C)
- Nuclease mix - preparation instructions:
- Included
DNA prep, library creation, and sequencing
- Nanopore kit
- Native Barcoding Kit 24 V14.
- Native Adapter (NA)
- Sequencing Buffer (SB)
- Library Beads (LIB) OR Library solution (LS)
- Elution buffer (EB)
- AMPure XP beads (AXP)
- Long Fragment Buffer (LFB) OR Short Fragment Buffer (SFB)
- EDTA
- Flow Cell Flush (FCF)
- Flow Cell Tether (FCT)
- Native Barcode Plate
- Native Barcoding Kit 24 V14.
- User-provided reagents
- NEB Blunt/TA Ligase Master Mix (NEB, M0367)
- NEBNext Ultra II End repair/dA-tailing Module (NEB, E7546)
- NEBNext Quick Ligation Module (NEB, E6056)
- Nuclease-free water (e.g., ThermoFisher, AM9937
- Freshly prepared 80% ethanol in nuclease-free water
- Bovine Serum Albumin (BSA) (50 mg/ml) (e.g, Invitrogen™ UltraPure™ BSA 50 mg/ml, AM2616)
References
This list assumes you are using the Sera-Xtracta Virus/Pathogen Kit for DNA extraction.
Personal protective equipment
- As recommended by original protocols (e.g., gloves, lab coat)
Sample collection and prep
- See Phage isolation and culturing instructions from SEA-PHAGES
DNA extraction
-
High titer phage lysates (≥ 9 x 10⁵ PFU/mL or plaque forming units per milliliter)
Tip
Medium titer phage lysates (107 - 109 PFU/mL) may provide enough DNA for sequencing.
-
Sera-Xtracta Virus/Pathogen Kit
- Included
- Binding/Lysis Reagent
- Wash Buffer
- SeraSil-Mag 400 beads
- SeraSil-Mag 700 beads
- Proteinase K liquid
- User-provided
- Ethanol (absolute)
- Nuclease free water
- Included
DNA prep, library creation, and sequencing
- Nanopore kit
- Native Barcoding Kit 24 V14.
- Native Adapter
- Sequencing Buffer
- Library Beads OR Library solution
- Elution buffer
- AMPure XP beads
- Long Fragment Buffer OR Short Fragment Buffer
- EDTA
- Flow Cell Flush
- Flow Cell Tether
- Native Barcode Plate
- Native Barcoding Kit 24 V14.
- User-provided reagents
- NEB Blunt/TA Ligase Master Mix (NEB, M0367)
- NEBNext Ultra II End repair/dA-tailing Module (NEB, E7546)
- NEBNext Quick Ligation Module (NEB, E6056)
- Nuclease-free water (e.g., ThermoFisher, AM9937)
- Freshly prepared 80% ethanol in nuclease-free water
- Bovine Serum Albumin (BSA) (50 mg/ml) (e.g, Invitrogen™ UltraPure™ BSA 50 mg/ml, AM2616)
Equipment and consumables
References
This list assumes you are using the Promega Wizard® DNA Clean-Up System - A7280 for DNA extraction.
Lab equipment
- Micropipette set (e.g., P2, P10, P100, P200, P1000) and tips
- Microcentrifuge (20,000 x g)
- Heat block or water bath
- Hula mixer (gentle rotator mixer)
- Qubit (dsDNA HS Assay Kit - ThermoFisher, Q32851; and assay tubes) or Nanodrop spectrophotometer for DNA quantification
- Permanent markers
- Magnetic rack for microfuge tubes
- PCR machine (for incubation of samples in PCR tubes)
- Microplate centrifuge, e.g., Fisherbrand™ Mini Plate Spinner Centrifuge (Fisher Scientific, 11766427)
- Vortex mixer
- Ice bucket
- Timer
Consumables
- Assorted tube racks (microfuge, conical tubes, and PCR tubes)
- Sterile 15 ml conical tubes
- 1.5-1.7 ml microfugue tubes
- 0.2 ml thin-walled PCR tubes
- (Optional) 1.5 ml and 2 ml Eppendorf DNA LoBind tubes
- (Optional) Eppendorf twin.tec® PCR plate 96 LoBind, semi-skirted (Eppendorf™, cat #0030129504) with heat seals
Nanopore sequencing equipment
- Sequencing device: MinION
Computer equipment
- Desktop or laptop for MinION device; internet access for online bioinformatics tools
References
This list assumes you are using the Sera-Xtracta Virus/Pathogen Kit for DNA extraction.
Lab equipment
- Micropipette set (e.g., P2, P10, P100, P200, P1000) and tips
- Microcentrifuge (20,000 x g)
- Heat block or water bath
- Hula mixer (gentle rotator mixer)
- Qubit (dsDNA HS Assay Kit - ThermoFisher, Q32851; and assay tubes) or Nanodrop spectrophotometer for DNA quantification
- Permanent markers
- Magnetic rack for microfuge tubes
- PCR machine (for incubation of samples in PCR tubes)
- Vortex mixer
- Ice bucket
- Timer
- (Optional) Microplate centrifuge, e.g., Fisherbrand™ Mini Plate Spinner Centrifuge (Fisher Scientific, 11766427)
Consumables
- Micropipette set (e.g., P10, P100, P1000) and tips
- (Optional) pipette tips with aerosol barrier
- Assorted tube racks (microfuge, conical tubes, and PCR tubes)
- Sterile 15ml conical tubes
- 1.5-1.7ml microfuge tubes
- (Optional) 1.5 ml and 2 ml Eppendorf DNA LoBind tubes
- (Optional) Eppendorf twin.tec® PCR plate 96 LoBind, semi-skirted (Eppendorf™, cat #0030129504) with heat seals
Nanopore sequencing equipment
- Sequencing device: MinION
Computer equipment
- Desktop or laptop for MinION device; internet access for online bioinformatics tools
Estimated timings
Extraction and quantification of phage genomic DNA
-
Promega Wizard® DNA Clean-Up System - A7280: 1 hour for an instructor to extract one sample; 1.5-2 hours for a class of 10 students
-
Qubit: 10 to 30 min depending on number of samples
Library preparation for sequencing
-
Rapid barcoding kit: 50 min
-
Native barcoding kit: 10-12 hours for an instructor depending on the number of samples; if needed, there are pausing points
Sequencing
- 1-3 days depending on the number of samples
Base calling and reads analysis
- For a whole sequencing run, a few hours to a few days depending on the number of reads, the basecalling model (i.e., fast, high accuracy, or super accurate), and system specifications.
Background
Bacteriophages (phages) are viruses that infect and replicate inside a bacterial host. Phages are the most abundant biological entities on Earth (estimated 1031), and their vast diversity remains largely unexplored even after decades of research. Whole genome sequencing (1) of isolated phages can determine the precise number and sequence of nucleotides that make up an entire genomic DNA (gDNA) molecule. This data allows researchers to explore phage diversity with a complete set of phage genes (e.g., DNA packaging, structural, DNA replication, lysis, lysogeny, anti-host defense genes, auxiliary metabolic genes), group phages into clusters, and perform genome comparisons.
- Read more about whole genome sequencing Wikipedia
In this phage genome experiment, students extract double-stranded gDNA from high titer lysates (≥ 9 x 10⁵ PFU/mL), quantify DNA concentrations, prepare DNA libraries for Nanopore sequencing, prime and load a MinION flow cell, and perform data analysis (i.e., basecalling, quality control, and genome assembly). Up to 96 phage isolates can be multiplexed on a single MinION flow cell, which allows every student to continue to take ownership of their project by sequencing their own isolate in the classroom. This research experience is designed to teach undergraduate students during a two-semester program, Phage Discovery and Phage Genomics, as implemented by most SEA-PHAGES Institutions; however, it is possible that a condensed version could be completed in one semester.
Additional Reading and Information
Cresawn, S. G., Bogel, M., Day, N., Jacobs-Sera, D., Hendrix, R. W., & Hatfull, G. F. (2011). Phamerator: a bioinformatic tool for comparative bacteriophage genomics. BMC bioinformatics, 12, 1-15. https://doi.org/10.1186/1471-2105-12-395
De Coster, W., D’hert, S., Schultz, D. T., Cruts, M., & Van Broeckhoven, C. (2018). NanoPack: visualizing and processing long-read sequencing data. Bioinformatics, 34(15), 2666-2669. https://doi.org/10.1093/bioinformatics/bty149
Kieft, K., Zhou, Z., & Anantharaman, K. (2020). VIBRANT: automated recovery, annotation and curation of microbial viruses, and evaluation of viral community function from genomic sequences. Microbiome, 8, 1-23. https://doi.org/10.1186/s40168-020-00867-0
Kolmogorov, M., Yuan, J., Lin, Y., & Pevzner, P. A. (2019). Assembly of long, error-prone reads using repeat graphs. Nature Biotechnology, 37(5), 540-546. https://doi.org/10.1038/s41587-019-0072-8
Moraru, C. (2023). VirClust—A tool for hierarchical clustering, core protein detection and annotation of (prokaryotic) viruses. Viruses, 15(4), 1007. https://doi.org/10.3390/v15041007
Moraru, C., Varsani, A., & Kropinski, A. M. (2020). VIRIDIC—A novel tool to calculate the intergenomic similarities of prokaryote-infecting viruses. Viruses, 12(11), 1268. https://doi.org/10.3390/v12111268
Nishimura, Y., Yoshida, T., Kuronishi, M., Uehara, H., Ogata, H., & Goto, S. (2017). ViPTree: the viral proteomic tree server. Bioinformatics, 33(15), 2379-2380. https://doi.org/10.1093/bioinformatics/btx157
Oxford Nanopore Technologies. Dorado. https://github.com/nanoporetech/dorado
Rinehart, C. A., Gaffney, B., Wood, J. D., & Smith, J. P. (2016). a Phage Evidence Collection and Annotation Network. https://discover.kbrinsgd.org/login
Russell DA, Hatfull GF. (2017). PhagesDB: the actinobacteriophage database. Bioinformatics, 33(5): 784-786. https://doi.org/10.1093/bioinformatics/btw711
SEA-PHAGES Phage Discovery Guide. https://seaphagesphagediscoveryguide.helpdocsonline.com/home
SEA-PHAGES Phage Genomics Guide. https://genomicsguide.seaphages.org/
The Galaxy Community. (2024). The Galaxy platform for accessible, reproducible, and collaborative data analyses: 2024 update, Nucleic Acids Research https://doi.org/10.1093/nar/gkae410
Wang, R. H., Yang, S., Liu, Z., Zhang, Y., Wang, X., Xu, Z., Wang, J., & Li, S. C. (2024). PhageScope: a well-annotated bacteriophage database with automatic analyses and visualizations. Nucleic Acids Research, 52(D1), D756-D761. https://doi.org/10.1093/nar/gkad979
Wick, R. (2017). Filtlong. In GitHub repository. GitHub. https://github.com/rrwick/Filtlong
Extraction and quantification of phage genomic DNA
Goal: Extract genomic phage DNA from high-titer lysate.(1)
References
This DNA extraction protocol uses the Promega Wizard® DNA Clean-Up System - A7280 and is taken from Protocol 9.1 in the SEA-PHAGES Discovery Guide
Supplies and reagent preparation for DNA extraction (1 sample)
-
Included in kit
- 2 ml DNA clean-up resin. Note: Thoroughly mix the Wizard® DNA Clean-Up Resin before taking an aliquot. If crystals or aggregates are present, warm the resin to 37°C for 10 minutes to dissolve them. The resin itself remains is insoluble. Allow it to cool to 25–30°C before use.
- 2 DNA clean-up columns
-
User-provided. Note: Optional reagents were used for the DNA extraction of phages BillyTP and Bhageatrice used as example data.
- 1 ml phage lysate (titer ≥ 5 x 10⁹ PFU/ml)
- 5 µl Nuclease mix
- 12 ml 80 % isopropanol, freshly prepared
- 3 ml syringes
- 0.5 µl Proteinase K (20 mg/mL) and 50 µl SDS (10%) (optional)
- 15 µl 0.5 M EDTA (optional)
- ddH2O pre-warmed (95 °C)
Degrade bacterial DNA/RNA in high-titer phage lysate
-
Aseptically transfer 1 ml of phage lysate into a microcentrifuge tube.
-
Wearing gloves and working in the designated area, add 5 µl nuclease mix to the lysate.
Important
The enzymes (RNase in particular) are very stable and can persist and contaminate equipment and supplies throughout the laboratory. Take precautions to keep and use them in the designated area.
-
Mix gently but thoroughly by repeated inversions—do not vortex!
-
Incubate at 37 °C for 10 minutes or room temperature for 30 minutes.
-
Remove and discard your gloves before returning to your bench.
Optional
[6]. Add 15 µl EDTA to the nuclease-treated lysate and mix gently. EDTA will inactivate the nucleases by chelating, or binding, divalent cations required by the nucleases for activity.
[7]. Add 0.5 µl Proteinase K and 50 µl SDS to the nuclease-treated lysate and mix gently. Incubate at 37 °C for 10 minutes. Proteinase K is added to degrade the nucleases added in Step 2. SDS stimulates the activity of Proteinase K.
Denature the protein capsid to release phage DNA
-
Put on a fresh pair of gloves.
-
Add 2 ml of DNA clean-up resin to a 15 ml conical tube.
- The DNA resin is a slurry solution containing microscopic polymer beads. Make sure that the bottle of resin is well mixed, the precipitate dissolved by heating to 37 °C, and the beads resuspended before aliquoting your 2 ml. (Your instructor may have done this for you.)
Warning
The resin contains guanidinium thiocyanate, a chemical that denatures proteins. Do not get it on your skin!
-
Transfer your nuclease-treated phage lysate from the microcentrifuge tube to the 15 ml conical tube containing resin.
-
Mix the solution by gently inverting the tube repeatedly for 2 minutes.
Isolate the phage genomic DNA
-
Label two Wizard Kit columns with your initials.
-
Remove the plungers from two 3 ml syringes and attach a column to each syringe barrel.
-
Follow the steps below for each column at the same time:
-
Set the column and syringe barrel on a new microcentrifuge tube.
-
Transfer 1.5 ml of phage DNA/resin solution to the column using a pipette.
-
Do not discard the empty 15 ml conical tube.
-
Insert a plunger into the syringe and carefully push all the liquid through, collecting the flow-through in the used 15 ml conical tube from above.
Important
The DNA is bound to the polymer beads that pack into the column as the liquid is pushed through. It is VERY important to maintain a firm, gentle, unrelenting, and even pressure on the syringe. Do not let the plunger pop out of the syringe barrel because releasing the vacuum will ruin the column.
-
Once the liquid is expelled, maintain pressure on the plunger as you dry residual liquid by touching the tip of the column to a paper towel.
-
Unscrew the column from the syringe barrel before releasing the plunger and set the column into a clean microcentrifuge tube.
-
Remove the plunger from the syringe barrel, and then reattach the syringe barrel to the column.
-
-
Wash the salts from the DNA (now in the column) with the following steps for each column:
-
Add 2 ml 80 % isopropanol to each syringe barrel/column and push the liquid through the column, repeating steps 3(d)–3(f).
-
Repeat twice, for a total of three isopropanol washes.
-
-
Remove residual isopropanol.
-
With each column in a fresh 1.5 ml microcentrifuge tube, spin at 10,000 × g for 5 minutes.
- The column will prevent the microfuge tube lids from closing. Arrange the open tubes in the centrifuge so that the lids point toward the center of the rotor.
-
Transfer columns to new 1.5 ml microcentrifuge tubes. Spin at 10,000 × g for 1 additional minute to remove any residual isopropanol.
-
Evaporate the last traces of isopropanol by removing your columns from the microcentrifuge tubes and placing them directly in a 90 °C heating block for 60 seconds.
Important
Leaving the columns in the heat block for more than 1 minute can lead to DNA damage.
-
-
Elute the phage DNA from the columns.
-
Place each column in a clean microcentrifuge tube and apply 50 μl of 90 °C sterile ddH2O directly to each column.
Important
Keep the ddH2O in the heating block so that it remains at 90 °C.
-
Incubate columns for 1 minute at room temperature.
-
Spin at 10,000 × g for 1 minute in a microcentrifuge.
-
Combine the products from both microcentrifuge tubes into one tube; this is your eluted phage DNA.
-
Determine the concentration of your phage DNA
-
Using a spectrophotometer (fluorimeter, or Nanodrop) and a protocol from your instructor, quantify your phage DNA.
-
Place at 4 °C for short-term storage (1–2 weeks) or at -20 °C for long-term storage.
Goal: Extract genomic phage DNA from high-titer lysate.
Alternatives to Promega Wizard
-
Other kits, such as the Pathogen/Viral Nucleic Acid Isolation Kit (Magnetic Bead System) from Norgen, are also likely to work.
-
A fully customized extraction kit is also possible, using third-party sourced or homemade reagents such as Lysis buffer (e.g., 2% SDS, 100 mM Tris-HCl ph8.0, 50 mM EDTA), Proteinase K solution (e.g., QIAGEN), and magnetic beads (e.g., Cytiva Sera Mag) to further reduce per sample costs. However, due to the large sizes in which individual reagents are sold and optimization, a fully customized extraction kit may require large upfront costs.
References
This DNA extraction protocol is taken from Sera-Xtracta Virus/Pathogen Kit
Reagent preparation before use of kit
80% ethanol wash solution (Wash 2)
Prepare an 80% ethanol wash solution. Note: Prepare enough 80% Ethanol for 950 μL per extraction reaction. Use 100% absolute ethanol and nuclease-free water.
SeraSil-Mag bead working solution
Prepare a working solution of SeraSil-Mag 400 and SeraSil-Mag 700 beads (supplied as separate vials in the kit) in a 1:1 ratio. Vortex SeraSil-Mag beads thoroughly before each is added to the pre-mixture and then again prior to use. Note: Prepare sufficient bead volume for 20 μL bead mixture per reaction.
Lysis and nucleic acid binding
-
Add 10 μL of Proteinase K Solution to a 1.5–2.0 mL microcentrifuge tube.
-
Add 100–400 μL of sample to the tube.
Tip
The Sera-Xtracta Virus/Pathogen Kit from Cytiva was tested down to ¼ volumes (384 total extractions per kit).
-
Add 20 μL of SeraSil-Mag bead working solution (as prepared above) and mix the solution by slowly pipetting up/down 5–10 times.
Note
Prior to adding, ensure SeraSil-Mag bead tubes are thoroughly vortexed and mix the beads frequently during pipetting.
-
Add 570 μL of binding/lysis reagent to the 1.5–2.0 mL microcentrifuge tube.
Note
Solution is highly viscous; pipette slowly to avoid a void volume in the tip and excess foaming.
-
Ensure thorough mixing of the solution, cap and place tube on vortex mixer set a medium speed for 1 minute. Pulse spin contents in a microcentrifuge to bring contents down.
-
Incubate tube on heat block set to 60°C for 10 minutes.
Note
Heat step enhances lysis and activates Proteinase K enzyme. If precipitation is evident, quick spin tube to bring down contents.
-
Place tube on magnet stand for 1 minute or until the solution becomes clear. Without disturbing bound beads, carefully remove the entire supernatant.
Wash the Bound RNA/DNA
-
Remove the sample tube from the magnet stand and add 950 μL Wash Buffer (Wash 1) to the sample tube. Mix by slowly pipetting the contents 5–10 times.
-
Ensure thorough mixing of the solution, cap and place tube on vortex mixer set a medium speed for 1 minute. Pulse spin contents in a microcentrifuge to bring contents down.
-
Place the tube on a magnet stand for 1 minute or until the solution becomes clear. Without disturbing bound beads, carefully remove the entire supernatant.
-
Remove the tube from the magnet stand and add 950 μL of freshly prepared 80% ethanol (Wash 2) to the sample tube.
-
Mix tube contents by slowly pipetting the contents up/down 5–10 times. Pulse spin contents in a microcentrifuge to bring contents down.
-
Place the tube on the magnet stand for 1 minute or until the solution becomes clear. While on the magnet stand, carefully remove the supernatant without disturbing the pellet.
-
Briefly remove the tube from the magnet stand allowing the beads to sink towards the bottom of the tube. Note: This should take 3–5 seconds.
-
Place the tube back onto the magnet. When the beads collect to the magnet use a 10 or 20 μL pipette to carefully remove any remaining ethanol.
Important
It is important to ensure that all the ethanol is removed.
-
Remove tube from magnetic stand and allow beads to dry for 2 minutes.
Elution of RNA/DNA
-
Add 50 μL of pre-heated (70°C–75°C) nuclease-free water to each sample tube. Pipette up and down slowly until all the beads are removed from the side of the tube and the entire bead mass is at the bottom of the tube (pulse spin the tubes in a microcentrifuge if needed).
-
Place the tube on the magnet stand for 1 minute or until contents are clear.
-
With the tube on the magnet, carefully transfer the eluate, containing the extracted RNA/DNA sample to a new microcentrifuge tube.
Note
A pulse spin in a microfuge is strongly recommended before magnet settling to ensure all the liquid sample in the tube is collected together in a single bulk volume at the bottom of the tube. Isolated droplets on the tube walls or trapped under the tube lid will affect results.
Storage of recovered nucleic acid
The protocol recommends elution of the sample in nuclease free water. Purified DNA or RNA maybe stored at 2°C–8°C for a short period when used immediately for analysis and/or downstream molecular biology/analytical applications. For long term storage aliquot and store purified DNA isolates at -20°C and RNA isolates at -80°C or less, the user might consider using standard TE buffer, pH 8–8.5 for DNA or 1 mM sodium citrate, pH 6.5 for RNA.
Quantification of DNA
Goal: Determine DNA concentration for library preparation.
Accurate DNA quantification is essential to normalize DNA inputs during library prep. Too much DNA from one sample may overwhelm the flow cell, resulting in fewer reads for other samples. An Invitrogen™ Qubit™ 4 Fluorometer is recommended for the most accurate DNA concentration readings.
References
This protocol is taken from General Qubit Assay Protocol
-
Set up two assay tubes for the standards and one assay tube for phage each sample.
-
Prepare the Qubit™ working solution by diluting the Qubit™ reagent 1:200 in Qubit™ buffer. Prepare 200 μL of working solution for each standard and sample.
-
Prepare the assay tubes according to the table
Tube Standards Phage sample Working solution* (from step 2) 190 μL 180-199 μL Standard (from kit) 10 μL — User sample — 1–20 μL Total Volume in each assay tube 200 μL 200 μL 
*Qubit 1X dsDNA assays (Cat. Nos. Q33230, Q33231, Q33265, Q33266) are supplied with a ready-to-use working solution, and do not require preparation.
-
Vortex all tubes for 2–3 seconds.
-
Incubate the tubes for 2 minutes at room temperature.
-
Insert the tubes in the Qubit™ Fluorometer and take readings. For detailed instructions, refer to the Qubit™ Fluorometer manual.
Tip
Qubit gives very accurate quantification of DNA. However, Nanodrop quantification gives absorbance, allowing you to determine the quality and "cleanness" of your extraction. Pure DNA A260/A280 ratio is about 1.8.
Info
Since we will follow the library preparation for the native barcoding kit, you will ideally need 400 ng of gDNA per sample if using >4 barcodes OR 1000 ng gDNA per sample if using ≤4 barcodes; however, phage genomes with as little as 63.8 ng have successfully been sequenced and assembled.
Flow cell check
When you are ready to prepare the library, you should proceed directly to loading the flow cells. Now is a good time to check the quality of your flow cell.
Library Preparation - Native Barcoding Prep (24)
Goal: Attach sequencing barcodes and adaptors necessary for Nanopore sequencing.
Nanopore
This protocol follows the MinION version of Native Barcoding Kit 24 V14 from Oxford Nanopore.
Materials, consumables, and equipment
-
Materials
- Native Barcoding Kit 24 V14 (SQK-NBD114.24)
- 400 ng gDNA per sample if using >4 barcodes
- OR 1000 ng gDNA per sample if using ≤4 barcodes
-
Consumables
- NEB Blunt/TA Ligase Master Mix (NEB, M0367)
- NEBNext FFPE Repair Mix (NEB, M6630)
- NEBNext Ultra II End repair/dA-tailing Module (NEB, E7546)
- NEBNext Quick Ligation Module (NEB, E6056)
- 0.2 ml thin-walled PCR tubes
- 1.5 ml and 2 ml Eppendorf DNA LoBind tubes
- Nuclease-free water (e.g., ThermoFisher, AM9937)
- Freshly prepared 80% ethanol in nuclease-free water
- Qubit™ Assay Tubes (Invitrogen, Q32856)
- Qubit dsDNA HS Assay Kit (ThermoFisher, Q32851)
- Bovine Serum Albumin (BSA) (50 mg/ml) (e.g, Invitrogen™ UltraPure™ BSA 50 mg/ml, AM2616)
- (Optional) Eppendorf twin.tec® PCR plate 96 LoBind, semi-skirted (Eppendorf™, cat #0030129504) with heat seals
-
Equipment
- Hula mixer (gentle rotator mixer)
- Microfuge
- Magnetic rack
- Vortex mixer
- Thermal cycler
- P1000, P200, P100, P20, P10, P2 pipettes and tips; Optional: Multichannel pipette and tips
- Eppendorf 5424 centrifuge (or equivalent)
- Qubit fluorometer (or equivalent for QC check)
- Microplate centrifuge, e.g., Fisherbrand™ Mini Plate Spinner Centrifuge (Fisher Scientific, 11766427)
- Ice bucket with ice
- Timer
DNA repair and end-prep
Goal: Ensure DNA ends are enzymatically prepared to attach barcodes.
-
Thaw the AMPure XP Beads (AXP) and DNA Control Sample (DCS) at room temperature and mix by vortexing. Keep the beads at room temperature and store the DNA Control Sample (DCS), if using, on ice.
-
Prepare the NEBNext FFPE DNA Repair Mix and NEBNext Ultra II End Repair / dA-tailing Module reagents in accordance with manufacturer’s instructions, and place on ice.
NEB enzyme prep instructions
-
Thaw all reagents on ice.
-
Flick and/or invert the reagent tubes to ensure they are well mixed.
Note
Do not vortex the FFPE DNA Repair Mix or Ultra II End Prep Enzyme Mix.
-
Always spin down tubes before opening for the first time each day.
-
The Ultra II End Prep Buffer and FFPE DNA Repair Buffer may have a little precipitate. Allow the mixture to come to room temperature and pipette the buffer up and down several times to break up the precipitate, followed by vortexing the tube for 30 seconds to solubilise any precipitate.
Note
It is important the buffers are mixed well by vortexing.
-
The FFPE DNA Repair Buffer may have a yellow tinge and is fine to use if yellow.
Important
-
Do not vortex the NEBNext FFPE DNA Repair Mix or NEBNext Ultra II End Prep Enzyme Mix.
-
It is important that the NEBNext FFPE DNA Repair Buffer and NEBNext Ultra II End Prep Reaction Buffer are mixed well by vortexing.
-
-
Dilute your DNA Control Sample (DCS) by adding 105 µl Elution Buffer (EB) directly to one DCS tube. Mix gently by pipetting and spin down.
Tip
Oxford Nanopore recommends using the DNA Control Sample (DCS) in your library prep for troubleshooting purposes. However, you can omit this step and make up the extra 1 µl with your sample DNA.
-
In clean 0.2 ml thin-walled PCR tubes (or a clean 96-well plate), prepare your DNA samples:
- For >4 barcodes, aliquot 400 ng per sample
- For ≤4 barcodes, aliquot 1000 ng per sample
-
Make up each sample to 11 µl using nuclease-free water. Mix gently by pipetting and spin down.
-
Combine the following components per tube/well; between each addition, pipette mix 10 - 20 times:
Reagent Volume DNA sample 11 µl Diluted DNA Control Sample (DCS) 1 µl NEBNext FFPE DNA Repair Buffer 0.875 µl Ultra II End-prep Reaction Buffer 0.875 µl Ultra II End-prep Enzyme Mix 0.75 µl NEBNext FFPE DNA Repair Mix 0.5 µl Total 15 µl Tip
Oxford Nanopore recommends making up a mastermix of the end-prep and DNA repair reagents for the total number of samples and adding 3 µl to each well.
-
Ensure the components are thoroughly mixed by pipetting and spin down in a centrifuge.
-
Using a thermal cycler, incubate at 20°C for 5 minutes and 65°C for 5 minutes.
-
Transfer each sample into a clean 1.5 ml Eppendorf DNA LoBind tube.
-
Resuspend the AMPure XP beads (AXP) by vortexing.
-
Add 15 µl of resuspended AMPure XP Beads (AXP) to each end-prep reaction and mix by flicking the tube.
-
Incubate on a Hula mixer (rotator mixer) for 5 minutes at room temperature.
-
Prepare sufficient fresh 80% ethanol in nuclease-free water for all of your samples. Allow enough for 400 µl per sample, with some excess.
-
Spin down the samples and pellet the beads on a magnet until the eluate is clear and colourless. Keep the tubes on the magnet and pipette off the supernatant.
-
Keep the tube on the magnet and wash the beads with 200 µl of freshly prepared 80% ethanol without disturbing the pellet. Remove the ethanol using a pipette and discard. If the pellet was disturbed, wait for beads to pellet again before removing the ethanol.
-
Repeat the previous step.
-
Briefly spin down and place the tubes back on the magnet for the beads to pellet. Pipette off any residual ethanol. Allow to dry for 30 seconds, but do not dry the pellets to the point of cracking.
- Remove the tubes from the magnetic rack and resuspend the pellet in 10 µl nuclease-free water. Spin down and incubate for 2 minutes at room temperature.
-
Pellet the beads on a magnet until the eluate is clear and colourless.
-
Remove and retain 10 µl of eluate into a clean 1.5 ml Eppendorf DNA LoBind tube. Dispose of the pelleted beads.
-
Quantify 1 µl of each eluted sample using a Qubit fluorometer.
Pause point
Take forward an equimolar mass of each sample to be barcoded forward into the native barcode ligation step. However, you may store the samples at 4°C overnight.
Native barcode ligation
Goal: Ligate barcodes to genomic DNA samples.
-
Prepare the NEB Blunt/TA Ligase Master Mix according to the manufacturer's instructions, and place on ice:
-
Thaw the reagents at room temperature.
-
Spin down the reagent tubes for 5 seconds.
-
Ensure the reagents are fully mixed by performing 10 full volume pipette mixes.
-
-
Thaw the EDTA at room temperature and mix by vortexing. Then spin down and place on ice.
-
Thaw the Native Barcodes (NB01-24) at room temperature. Briefly spin down, individually mix the barcodes required for your number of samples by pipetting, and place them on ice.
-
Select a unique barcode for each sample to be run together on the same flow cell. Up to 24 samples can be barcoded and combined in one experiment. Only use one barcode per sample.
-
In clean 0.2 ml PCR-tubes or a 96-well plate, add the reagents in the following order per well; Between each addition, pipette mix 10 - 20 times.
Reagent Volume End-prepped DNA 7.5 µl Native Barcode (NB01-24) 2.5 µl Blunt/TA Ligase Master Mix 10 µl Total 20 µl -
Thoroughly mix the reaction by gently pipetting and briefly spinning down.
-
Incubate for 20 minutes at room temperature.
-
Add the following volume of EDTA to each well and mix thoroughly by pipetting and spin down briefly. Note: Ensure you follow the instructions for the cap colour of your EDTA tube. EDTA is added at this step to stop the reaction.
EDTA Cap Colour Volume per Well Clear Cap EDTA 2 µl Blue Cap EDTA 4 µl -
Pool all the barcoded samples in a 1.5 ml Eppendorf DNA LoBind tube. Note: Ensure you follow the instructions for the cap colour of your EDTA tube.
Volume per Sample For 6 Samples For 12 Samples For 24 Samples Total volume for preps using clear cap EDTA 22 µl 132 µl 264 µl 528 µl Total volume for preps using blue cap EDTA 24 µl 144 µl 288 µl 576 µl Tip
Oxford Nanopore recommends checking the base of your tubes/plate are all the same volume before pooling and after to ensure all the liquid has been taken forward.
-
Resuspend the AMPure XP Beads (AXP) by vortexing.
-
Add 0.4X AMPure XP Beads (AXP) to the pooled reaction, and mix by pipetting. Note: Ensure you follow the instructions for the cap colour of your EDTA tube.
Volume per Sample For 6 Samples For 12 Samples For 24 Samples Volume of AXP for preps using clear cap EDTA 9 µl 53 µl 106 µl 211 µl Volume of AXP for preps using blue cap EDTA 10 µl 58 µl 115 µl 230 µl -
Incubate on a Hula mixer (rotator mixer) for 10 minutes at room temperature.
-
Prepare 2 ml of fresh 80% ethanol in nuclease-free water.
-
Spin down the sample and pellet on a magnet for 5 minutes. Keep the tube on the magnetic rack until the eluate is clear and colourless, and pipette off the supernatant.
-
Keep the tube on the magnetic rack and wash the beads with 700 µl of freshly prepared 80% ethanol without disturbing the pellet. Remove the ethanol using a pipette and discard. If the pellet was disturbed, wait for beads to pellet again before removing the ethanol.
-
Repeat the previous step.
-
Spin down and place the tube back on the magnetic rack. Pipette off any residual ethanol. Allow the pellet to dry for ~30 seconds, but do not dry the pellet to the point of cracking.
-
Remove the tube from the magnetic rack and resuspend the pellet in 35 µl nuclease-free water by gently flicking.
-
Incubate for 10 minutes at 37°C. Every 2 minutes, agitate the sample by gently flicking for 10 seconds to encourage DNA elution.
-
Pellet the beads on a magnetic rack until the eluate is clear and colourless.
-
Remove and retain 35 µl of eluate into a clean 1.5 ml Eppendorf DNA LoBind tube.
-
Quantify 1 µl of each eluted sample using a Qubit fluorometer.
Pause point
Take forward the barcoded DNA library to the adapter ligation and clean-up step. However, you may store the sample at 4°C overnight.
Adapter ligation and clean-up
Goal: Ligate sequencing adapters to barcoded genomic DNA.
-
Prepare the NEBNext Quick Ligation Reaction Module according to the manufacturer's instructions, and place on ice:
-
Thaw the reagents at room temperature.
-
Spin down the reagent tubes for 5 seconds.
-
Ensure the reagents are fully mixed by performing 10 full volume pipette mixes. Note: Do NOT vortex the Quick T4 DNA Ligase.
Note
The NEBNext Quick Ligation Reaction Buffer (5x) may have a little precipitate. Allow the mixture to come to room temperature and pipette the buffer up and down several times to break up the precipitate, followed by vortexing the tube for several seconds to ensure the reagent is thoroughly mixed.
Important
Do not vortex the Quick T4 DNA Ligase.
-
-
Spin down the Native Adapter (NA) and Quick T4 DNA Ligase, pipette mix and place on ice.
-
Thaw the Elution Buffer (EB) at room temperature and mix by vortexing. Then spin down and place on ice.
Important
Depending on the wash buffer (LFB or SFB) used, the clean-up step after adapter ligation is designed to either enrich for DNA fragments of >3 kb, or purify all fragments equally.
- To enrich for DNA fragments of 3 kb or longer, use Long Fragment Buffer (LFB); We recommend using this buffer.
- To retain DNA fragments of all sizes, use Short Fragment Buffer (SFB)
-
Thaw either Long Fragment Buffer (LFB) or Short Fragment Buffer (SFB) at room temperature and mix by vortexing. Then spin down and keep at room temperature.
-
In a 1.5 ml Eppendorf LoBind tube, mix in the following order; Between each addition, pipette mix 10 - 20 times:
Reagent Volume Pooled barcoded sample 30 µl Native Adapter (NA) 5 µl NEBNext Quick Ligation Reaction Buffer (5X) 10 µl Quick T4 DNA Ligase 5 µl Total 50 µl -
Thoroughly mix the reaction by gently pipetting and briefly spinning down.
-
Incubate the reaction for 20 minutes at room temperature.
Important
The next clean-up step uses Long Fragment Buffer (LFB) or Short Fragment Buffer (SFB) rather than 80% ethanol to wash the beads. The use of ethanol will be detrimental to the sequencing reaction.
-
Resuspend the AMPure XP Beads (AXP) by vortexing.
-
Add 20 µl of resuspended AMPure XP Beads (AXP) to the reaction and mix by pipetting.
-
Incubate on a Hula mixer (rotator mixer) for 10 minutes at room temperature.
-
Spin down the sample and pellet on the magnetic rack. Keep the tube on the magnet and pipette off the supernatant.
-
Wash the beads by adding either 125 μl Long Fragment Buffer (LFB) or Short Fragment Buffer (SFB). Flick the beads to resuspend, spin down, then return the tube to the magnetic rack and allow the beads to pellet. Remove the supernatant using a pipette and discard.
-
Repeat the previous step.
-
Spin down and place the tube back on the magnet. Pipette off any residual supernatant.
-
Remove the tube from the magnetic rack and resuspend pellet in 15 µl Elution Buffer (EB).
-
Spin down and incubate for 10 minutes at 37°C. Every 2 minutes, agitate the sample by gently flicking for 10 seconds to encourage DNA elution.
-
Pellet the beads on a magnet until the eluate is clear and colourless, for at least 1 minute.
-
Remove and retain 15 µl of eluate containing the DNA library into a clean 1.5 ml Eppendorf DNA LoBind tube; Dispose of the pelleted beads
-
Quantify 1 µl of eluted sample using a Qubit fluorometer.
-
Depending on your DNA library fragment size, prepare your final library in 12 µl of Elution Buffer (EB).
Fragment Library Length Flow Cell Loading Amount Very short (<1 kb) 100 fmol Short (1-10 kb) 35–50 fmol Long (>10 kb) 300 ng Note
-
If the library yields are below the input recommendations, load the entire library.
-
If required, we recommend using a mass to mol calculator such as the NEB calculator.
-
End of library prep
The prepared library is used for loading onto the flow cell. Store the library on ice or at 4°C until ready to load.
Tip
Library storage recommendations
Oxford Nanopore recommends storing libraries in Eppendorf DNA LoBind tubes at 4°C for short-term storage or repeated use, for example, re-loading flow cells between washes. For single use and long-term storage of more than 3 months, we recommend storing libraries at -80°C in Eppendorf DNA LoBind tubes.
If quantities allow, the library may be diluted in Elution Buffer (EB) for splitting across multiple flow cells. Depending on how many flow cells the library will be split across, more Elution Buffer (EB) than what is supplied in the kit will be required.
Priming and loading the flow cell
Goal: Load prepared library for sequencing.(1)
- Video and guide: Priming and loading your flow cell
-
Thaw the Sequencing Buffer (SB), Library Beads (LIB) or Library Solution (LIS, if using), Flow Cell Tether (FCT) and Flow Cell Flush (FCF) at room temperature before mixing by vortexing. Then spin down and store on ice.
Tip
BSA: For optimal sequencing performance and improved output on MinION R10.4.1 flow cells (FLO-MIN114), Oxford Nanopore recommends adding Bovine Serum Albumin (BSA) to the flow cell priming mix at a final concentration of 0.2 mg/ml.
Loading Beads or Solution: For most sequencing experiments, use the Library Beads (LIB) for loading your library onto the flow cell. However, for viscous libraries it may be difficult to load with the beads and may be appropriate to load using the Library Solution (LIS).
-
To prepare the flow cell priming mix with BSA, combine Flow Cell Flush (FCF) and Flow Cell Tether (FCT), as directed below. Mix by pipetting at room temperature.
Note
Oxford Nanopore is in the process of reformatting our kits with single-use tubes into a bottle format. Please follow the instructions for your kit format.
-
Single-use tubes format: Add 5 µl Bovine Serum Albumin (BSA) at 50 mg/ml and 30 µl Flow Cell Tether (FCT) directly to a tube of Flow Cell Flush (FCF).
-
Bottle format: In a suitable tube for the number of flow cells, combine the following reagents:
Reagent Volume per Flow Cell Flow Cell Flush (FCF) 1,170 µl Bovine Serum Albumin (BSA) at 50 mg/ml 5 µl Flow Cell Tether (FCT) 30 µl Total Volume 1,205 µl
-
-
Open the MinION or GridION device lid and slide the flow cell under the clip. Press down firmly on the priming port cover to ensure correct thermal and electrical contact.
Flow cell check
Complete a flow cell check to assess the number of pores available before loading the library.This step can be omitted if the flow cell has been checked previously. See the flow cell check instructions in the MinKNOW protocol for more information.
-
Slide the flow cell priming port cover clockwise to open the priming port.
Important
Take care when drawing back buffer from the flow cell. Do not remove more than 20-30 µl, and make sure that the array of pores are covered by buffer at all times. Introducing air bubbles into the array can irreversibly damage pores.
-
After opening the priming port, check for a small air bubble under the cover. Draw back a small volume to remove any bubbles:
- Set a P1000 pipette to 200 µl
- Insert the tip into the priming port
- Turn the wheel until the dial shows 220-230 µl, to draw back 20-30 µl, or until you can see a small volume of buffer entering the pipette tip. Note: Visually check that there is continuous buffer from the priming port across the sensor array.
-
Load 800 µl of the priming mix into the flow cell via the priming port, avoiding the introduction of air bubbles. Wait for five minutes. During this time, prepare the library for loading by following the steps below.
-
Thoroughly mix the contents of the Library Beads (LIB) by pipetting.
Important
The Library Beads (LIB) tube contains a suspension of beads. These beads settle very quickly. It is vital that they are mixed immediately before use.
-
In a new 1.5 ml Eppendorf DNA LoBind tube, prepare the library for loading as follows:
Reagent Volume per Flow Cell Sequencing Buffer (SB) 37.5 µl Library Beads (LIB) mixed immediately before use, or Library Solution (LIS), if using 25.5 µl DNA Library 12 µl Total 75 µl -
Complete the flow cell priming:
-
Gently lift the SpotON sample port cover to make the SpotON sample port accessible.
-
Load 200 µl of the priming mix into the flow cell priming port (not the SpotON sample port), avoiding the introduction of air bubbles.
-
-
Mix the prepared library gently by pipetting up and down just prior to loading.
-
Add 75 μl of the prepared library to the flow cell via the SpotON sample port in a dropwise fashion. Ensure each drop flows into the port before adding the next.
-
Gently replace the SpotON sample port cover, making sure the bung enters the SpotON port and close the priming port.
-
Place the light shield onto the flow cell, as follows:
-
Carefully place the leading edge of the light shield against the clip. Note: Do not force the light shield underneath the clip.
-
Gently lower the light shield onto the flow cell. The light shield should sit around the SpotON cover, covering the entire top section of the flow cell.
-
-
Close the device lid and set up a sequencing run on MinKNOW.
Sequencing on MinKNOW
Phage Sequencing Tips
| Sequencer | Description |
|---|---|
| MinION Mk1B (recommended) | This sequencer uses MinION flow cells and requires an external computer for acquisition and base-calling. (IT requirements) |
| MinION Mk1C (discontinued) | This sequencer used MinION flow cells in an integrated mini-computer to provide an ‘all-included’ sequencing experience. It has been discontinued and is being replaced by the MinION Mk1D iPad accessory. |
| MinION Mk1D | This sequencer uses MinION flow cells and requires an external computer for acquisition and base-calling. It replaces the Mk1B with better temperature control and USB-C connectivity. (IT requirements) |
| Flongle | This adapter converts any MinION flow cell-capable sequencer to use Flongle flow cells. (MinION Mk1B IT requirements) |
| GridION | This sequencer is a desktop computer with five integrated MinION flow cell slots. (IT requirements) |
| PromethION | This sequencer is a large production-scale machine better suited for larger projects than bacteriophage genomes. (IT requirements) |
| Flow Cells (Pores / Hours) | Details |
|---|---|
| Flongle | >50 pores / 16 hours |
| MinION | >800 pores / 72 hours |
| PromethION | >5000 pores / 72 hours |
Sequencing Time Sequencing time varies per flow cell and multiplexing.
- Flongle flow cells are generally used and disposed of after their entire lifespan.
- MinION or PromethION flow cells can be used in short bursts (1-6h) and either continued or reset using a wash kit and reused with other samples if sufficient data has been captured. Unwashed flow cells can be stored at 4℃ until analysis is completed to continue acquisition if data is insufficient.
| Basecalling | Description |
|---|---|
| File Formats | Nanopore sequencing produces two primary file formats: FASTQ and POD5. The raw data generated by nanopore electrical trace signals are stored in POD5 files, which are then converted to FASTQ files through basecalling. FASTQ files contain nucleotide sequences and quality scores. FASTQ files can always be regenerated from POD5 files using different models. |
| Fast or High Accuracy (HAC) | Sufficient for phage cluster identification and initial assessment of sequencing depth (bases sequenced / ~50 kB average phage genome size). |
| Super Accurate (SUP) | Highest quality available, reaching 98-99.5% raw read accuracy. Reduces the chances of assembly errors and is recommended for publication. |
| Notes / Recommendations | Basecalling can be performed with Dorado, integrated within MinKNOW, either during sequencing or after. It can also be run as a standalone tool. SUP basecalling is computationally intensive. If the minimum computer requirements are not met, we recommend performing basecalling on Google Colab or a supercomputing cluster. |
Bioinformatics
For the following steps, you will use the MinKNOW software to operate the MinION device.
-
Navigate to the start page and click Start sequencing.
-
Fill in your experiment details, such as name and flow cell position and sample ID.
-
Select the sequencing kit (Native Barcoding Kit 24 V14 (SQK-NBD114.24)) used in the library preparation on the Kit page.
-
Configure the sequencing parameters for your sequencing run or keep to the default settings on the Run options and Analysis tabs.
We recommend:
- Raw reads: .POD5
- Basecalled reads: FASTQ
- Basecalling: High-accuracy basecalling (HAC) or Super-accurate basecalling (SUP)
- Modified bases: Off
We recommend:
- Raw reads: .POD5
- Basecalled reads: FASTQ
- Basecalling: Fast basecalling
- Modified bases: Off
Tip
You may also leave all basecalling off if you will perform that operation on a cloud platform or more powerful computer.
-
On the Output page, set up the output parameters or keep to the default settings.
-
Click Start on the Review page to start the sequencing run.
Pause point
In most cases, you can generate useful data to analyze within an hour. A more complete dataset will take about 24 hours.
Data analysis - basecalling, quality control, and assembly
Goal: Use cloud platforms to basecall data, perform quality control, and assemble phage genomes.
Example data
Example Nanopore data can be downloaded from the 'Example phage data' Google Drive folder, and assemblies can be compared to the Illumina assemblies on the Actinobacteriophage Database at phagesdb.org.
Cluster AY Arthrobacter globiformis phage BillyTP
• Basecalling: File BillyTP_0.pod5 contains the raw signal data. Due to the size of POD5 files, only one pod5 file with a subset of the data is provided for the basecalling tutorial and does not contain all of the reads used to assemble the genome below.
• Quality control and Assembly: Three fastq files (BillyTP_0.fastq, BillyTP_1.fastq, BillyTP_2.fastq) contain the ‘sup@v5.0’ basecalled reads needed for assembly. When compared with the PhagesDB reference that was sequenced with Illumina (GenBank Accession Number: PP978841), the contig assembled with Flye (53,003 bp; ~710X) varied by one single nucleotide base at position 46,969, which is likely a “growth” mutation and not due to a sequencing or assembly error. NOTE: A smaller contig is also assembled, which is the ~3-4 kb positive control phage Lambda.
Cluster AY Arthrobacter globiformis phage Bhageatrice
• Quality control and Assembly: Three fastq.gz files (Bhageatrice_0.fastq.gz, Bhageatrice_1.fastq.gz, and Bhageatrice_2.fastq.gz) contain the ‘sup@v5.0’ basecalled reads needed to assemble a 54,699 bp contig (~954X coverage). The Nanopore assembly is 100% identical to the Illumina assembly provided on the PhagesDB phage page.
Cluster FE Arthrobacter globiformis phage CabbageMan
• Basecalling: File cabbageman.pod5 contains the raw signal data for ~347X the CabbageMan genome needed to baseball into a FASTQ file.
• Quality control and Assembly: File cabbageman.v5.fastq contains the ‘sup@v5.0’ basecalled reads needed to assemble the genome using Flye and produces the exact same 15,612bp assembly as the PhagesDB reference that was sequenced with Illumina (GenBank Accession Number: PQ362679).
Bioinformatics
For the following steps, you will use the Dorado software on Google Colab to perform basecalling.
Basecalling with Dorado using Google Colab (convert POD5 to FASTQ)
Before genome assembly, basecalling must be performed to convert POD5 files to FASTQ files. See sample POD5 files of phages BillyTP and CabbageMan.
Basecalling with Dorado using Google Colab (convert pod5 to fastq)
-
Go to Google Colab. Purchase compute units (if needed). Click on the solid down arrow (upper right), click ‘View resources’, click ‘Learn more’ to purchase computer units.

-
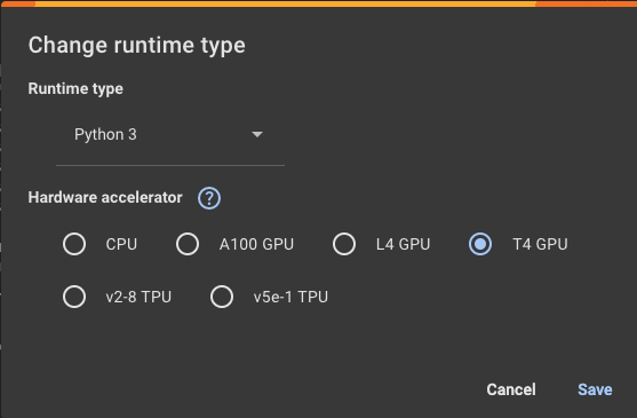
Click on ‘Connect’ (upper right) and select ‘T4 GPU’ under ‘Hardware accelerator’. NOTE: L4 and A100 GPUs will perform faster but cost more to run. Phage genomes are generally small and do not require heavy computational resources.
-
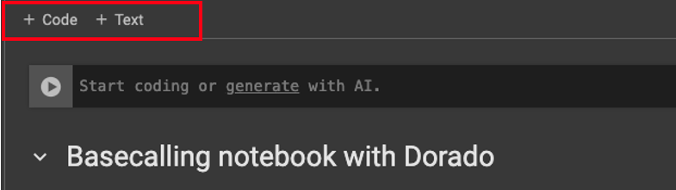
Add code by clicking ‘+ Code’. Connect notebook to Google Drive storage; click play symbol to run code (~20 s). NOTE: Text can be added to the notebook by clicking ‘+ Text’.
from google.colab import drive drive.mount('/content/drive') -
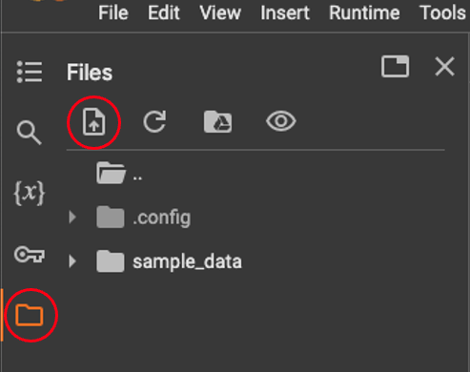
Upload pod5 data. Alternatively, the files can be used from Google Drive.
-
Download the Dorado software (1 min). Please see https://github.com/nanoporetech/dorado to select the appropriate path as versions and instructions may change in the future. (linux-x64 is needed for Google Colab)
!wget https://cdn.oxfordnanoportal.com/software/analysis/dorado-0.7.1-linux-x64.tar.gz -
Decompress/unpack the Dorado software (1 min).
!tar -xvf dorado-0.7.1-linux-x64.tar.gz -
Run super accurate (SUP) basecalling with Dorado to convert the POD5 files into FASTQ files (~3-4 min). Models can be specified as ‘fast’, ‘hac’, ‘sup’ for the latest model available or explicitly as ‘sup@v5’.
!dorado-0.7.1-linux-x64/bin/dorado basecaller --emit-fastq sup BillyTP_barcode11_0.pod5 >BillyTP_barcode11_0.fastqNOTE: The above command will work when using a single phage or pre-demultiplexed POD5 such as the example data provided here. When using a native or rapid barcoding kit, the below two step commands are needed.
7b.
!dorado-0.7.1-linux-x64/bin/dorado basecaller --kit-name SQK-RBK114-24 sup@v5 multiplexdata.pod5 > intermediatefile.bam !dorado-0.7.1-linux-x64/bin/dorado demux --emit-fastq --no-classify --output-dir demultiplexed-fastqs intermediatefile.bam -
Optional: Gzip the FASTQ file (~ 5 s).
!gzip BillyTP_barcode11_0.fastq -
Copy ‘.fastq’ or ‘.fastq.gz’ file to your Google Drive or download it to your computer. Files will not save in Google Colab.
!cp BillyTP_barcode11_0.fastq.gz /path/to/directory
Bioinformatics
For the following steps, you will use the Nanoplot software on Galaxy for quality control of reads.
Read summary statistics using Nanoplot on Galaxy
This is a tutorial for summary statistics of the read number, length, and quality using fastq or fastq.gz files. Use sample fastq or fastq.gz data of phages BillyTP, Bhageatrice, and CabbageMan.
Read summary statistics using Nanoplot on Galaxy
-
Go to Galaxy; if needed, create a free account. All accounts come with a 250 Gb disk quota.
-
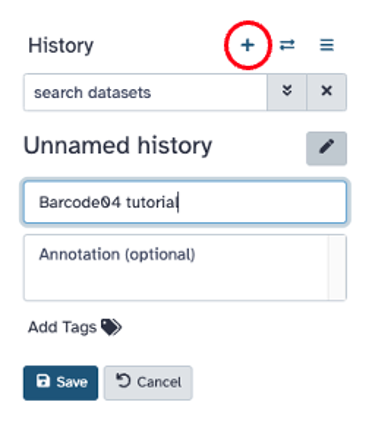
Add a new history by clicking the ‘+’ on the upper right hand side of the screen and name the history. Click ‘Save’.
-
Upload data (FASTQ or FASTQ.GZ) on the upper left hand side of the screen. Drag and drop file(s) to the screen or select ‘Choose local file’. Click start to upload the file(s). On the right hand side of the screen, files that have been uploaded successfully will turn green on the right hand side of the screen.

Upper left hand side of screen 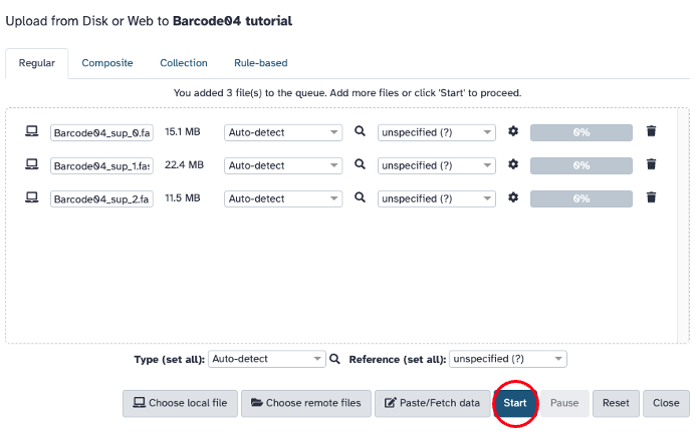
Middle of screen 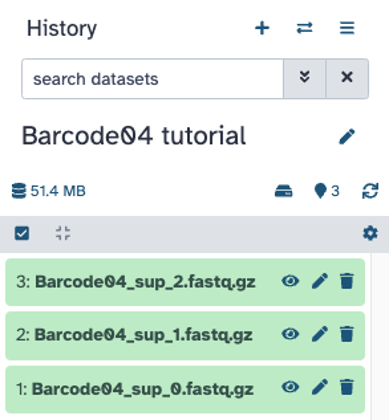
-
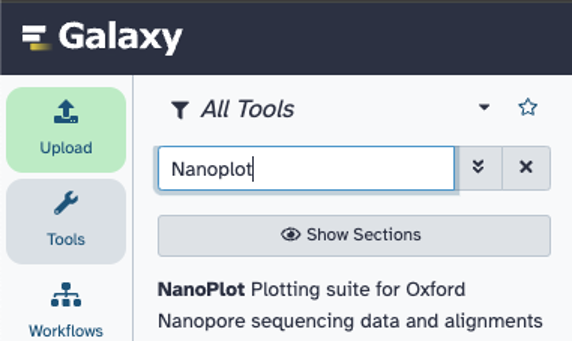
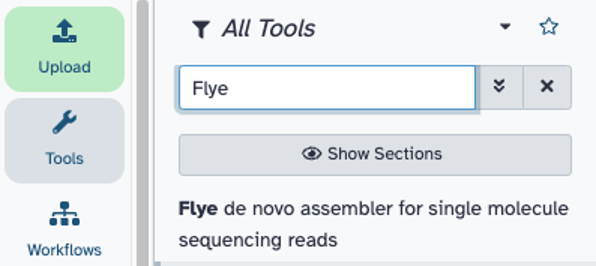
Search for and click on ‘NanoPlot’ tool
-
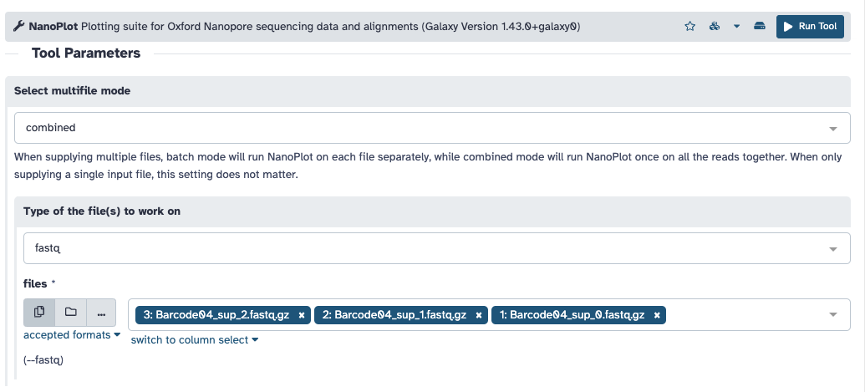
Select FASTQ or FASTQ.GZ file if using one file and click ‘Run Tool’. You can also change the option under ‘Select multifile mode’ from ‘batch’ to ‘combined’ to add multiple files.
-
View ‘HTML report’ file on screen by clicking the eye icon; if needed, download figures from ‘HTML report’ and summary statistics from ‘NanoStats’. Summary statistics and plots can be found below.
Filtering reads (optional): Short (e.g., <5 kb) and low quality reads (e.g., <10 Q-score) can be filtered out and visualized with Nanoplot. If needed, Filtlong on Galaxy can be used to filter out reads to make a new filtered fastq file. Alternatively, Nanofilt can be installed to filter fastq files. Depending on the dataset, more stringent filtering options can be set. Filtering was not required to assemble the high quality genomes from the sample data.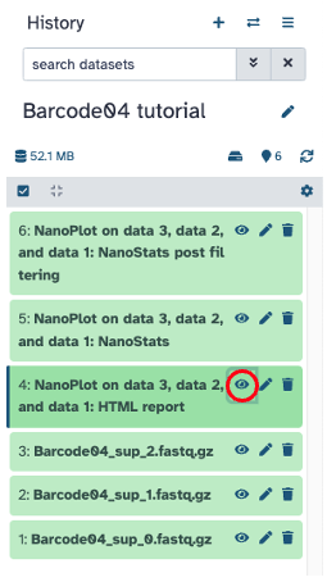
Cluster AY Phage BillyTP (Fall 2023) Bhageatrice (Fall 2024) fragment buffer used during library prep* Short fragment buffer (SFB) Long fragment buffer (LFB) Reads contain positive control phage Lambda (3-4 kb)* yes no Genome size (bp)* 53,003 54,699 number of reads 12,121 4,674 number of bases 41,633,273 53,595,600 median read length 906 8,232.5 mean read length 3,434.8 11,466.8 read length stdev 7,515.7 12,187.2 N50 12,870 21,560 mean qual 13.8 18.4 median qual 15.4 20.8 Reads >Q10: 11,602 (95.7%) 40.2Mb 4,673 (100.0%) 53.6Mb Reads >Q15: 6,828 (56.3%) 28.7Mb 4,307 (92.1%) 49.9Mb Reads >Q20: 225 (1.9%) 0.2Mb 2,848 (60.9%) 34.5Mb Reads >Q25: 2 (0.0%) 0.0Mb 251 (5.4%) 0.3Mb Reads >Q30: 0 (0.0%) 0.0Mb 86 (1.8%) 0.0Mb Nanoplot summary statistics of the sequence data used to assemble cluster AY phages BillyTP (Genome: 53,003 bp) and Bhageatrice (Genome: 54,699 bp). There are two main reasons why the mean read lengths are shorter for BillyTP: 1) the fastq files contain a short fragment of the positive control phage Lamda (3-4 kb); 2) the short fragment buffer (SFB) was used during library prep. The long fragment buffer allowed for size selection of DNA fragments that were >3,000 bp, and therefore, longer read lengths were sequenced in phage Bhageatrice. The longer, higher quality reads of phage Bhageatrice reduced the total number of reads needed for genome assembly. *Information not provided by Nanoplot.
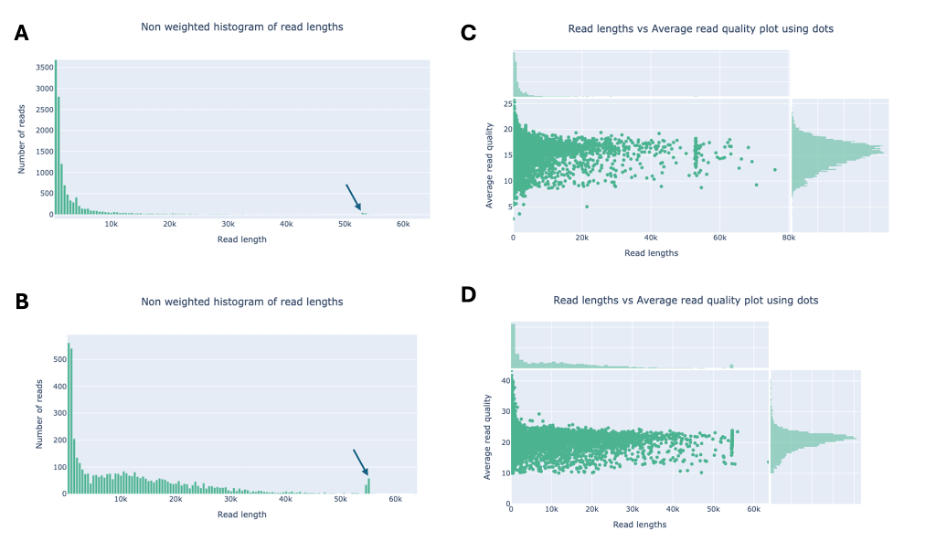
Figure 1 (A-D). Nanoplot plots of the read lengths (A, B) and read lengths vs. average read quality (C, D) for phages BillyTP (A, C) and Bhageatrice (B, D). The blue arrows in Figs. 2A and B are showing reads that are approximately the size of the phage genomes.
Genome assembly, annotation, and analysis tools
Genome assembly, annotation, and analysis tools
| Category | Description & Resources |
|---|---|
| Assembly | Resources for assembly Flye (Kolmogorov et al. 2019) • Galaxy • Google Colab • EPI2ME (desktop/cloud): The bacterial genome assembly workflow can be used for assembly until a virus-specific workflow is available. Computer requirements for EPI2ME desktop: • Recommended: CPUs = 16; Memory = 64GB • Minimum: CPUs = 8; Memory = 32GB Notes & recommendations: Aim for 100-1000X coverage. Coverage that is too low or too high can cause errors in the assembly; however, successful assemblies have been obtained from as low as 20X, provided the reads were of high quality and length. Post-assembly editing of the genome termini might be required. Google Colab Pro Pricing: Google Colab Pro costs $9.99/month for 100 compute units. Alternatively, a ‘Pay as you go’ option allows purchasing 100 compute units for $9.99. Compute units expire after 90 days. This should be sufficient to run approximately 25 to 50 assemblies of medium-sized phage genomes (~40-60 kbp). Additional resources: BV-BRC |
| Annotation | Resources for manual annotation: • SEA-PHAGES Phage Genomics Guide • The Actinobacteriophage Database at phagesdb.org • PECAAN (Rinehart et al. 2016; User Manual) Resources for automatic annotation: • VIBRANT (Kieft et al. 2020) • PhageScope (Wang et al. 2024) • Phagenomics Note: Automatic annotations should be double-checked before genomes are finalized. |
| Analysis | Resources for genomic analysis and comparisons: • Phamerator (Cresawn et al. 2011): Run locally by installing from GitHub or visualize genomes on the Phamerator website • VIRIDIC (Moraru et al. 2020): Run locally by installing from GitHub or run on VIRIDIC website • VirClust (Moraru 2023): Run locally by installing from Github or run on VirClust website • ViPTree (Nishimura et al. 2017): Run locally by installing from Github or run on the ViPTree server |
Bioinformatics
For the following steps, you will use the Flye software on Galaxy to assemble reads.
Genome Assembly with Flye on Galaxy
The number of reads needed to assemble a phage genome will vary depending on the size and complexity of the genome and the length and quality of the reads. Most phage genomes should be able to assemble with Flye on Galaxy; however, if more RAM is needed, the assembly can be run on Google Colab (see following tutorial) or a supercomputing cluster. See sample FASTQ or FASTQ.GZ data of phages BillyTP, Bhageatrice, and CabbageMan.
Genome assembly with Flye on Galaxy
-
Go to Galaxy; if needed, create an account. All accounts come with a 250 Gb disk quota.
-
Add data to a previous history or click the ‘+’ (upper right) to create a new history. Click the pencil icon (Edit) to rename history.
-
Click ‘Upload’ (upper left) and drag and drop or select the ‘fastq’ or ‘.fastq.gz’ files from your computer. Click ‘Start’ to upload your files. Files that have been uploaded will turn green on the right hand side of the page.

Upper left hand side of screen 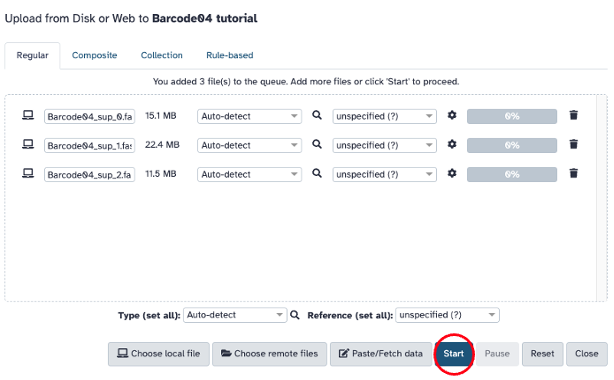
Middle of screen 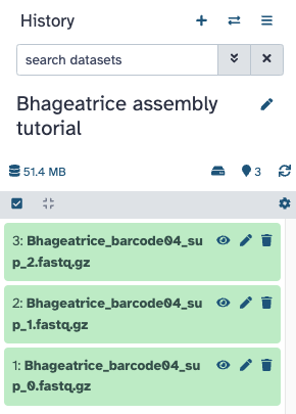
Right hand side of screen -
Go to ‘search tools’ and search for and click on ‘Flye’
-
Select the ‘fastq.gz’ files that you would like to assemble, and run with default options:
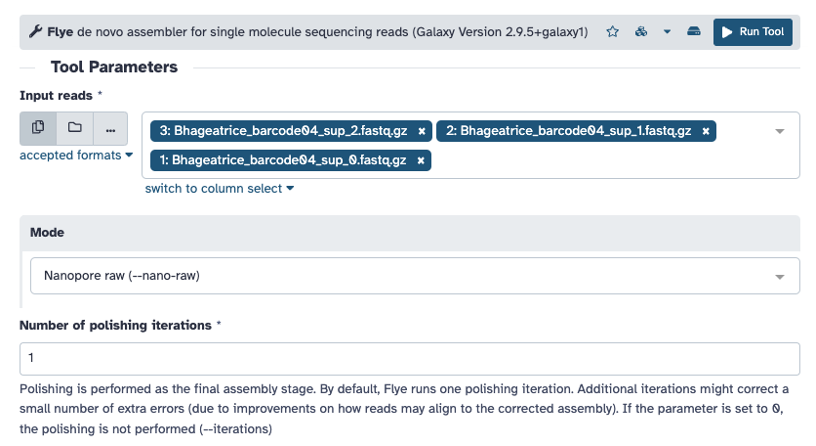
- Mode: Nanopore raw (--nano-raw). NOTE: Nanopore HQ (--nano-hq) can also be selected if the reads are high quality
- Number of polishing iterations (1)
- Keep haplotypes (no)
- Enable scaffolding using graph (no)
- Perform metagenomic assembly (no)
- Reduced contig assembly coverage (disable reduced coverage for initial disjointing assembly). Can enable if needed.
- Remove all non-primary contigs from the assembly (no)
- Generate a log file (no). Can select ‘yes’ if needed.
- Additional options: email notification. Select ‘yes’, if needed.
-
Click ‘Run Tool’
-
Outputs. The run has started when the outputs on the right hand side have turned tan and have finished when they have turned green. The following are the outputs. The eye icon (Display) can be used to view the file. Each output can be downloaded by clicking on the output name and selecting the floppy disk icon (Download).
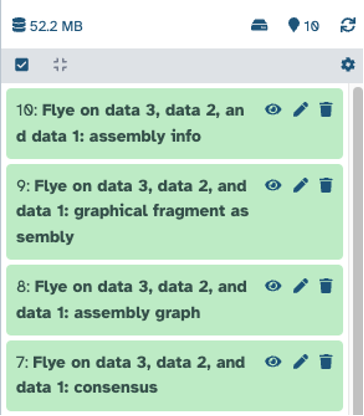
- Consensus: a fasta file containing the contigs
- Assembly graph
- Graphical fragment assembly
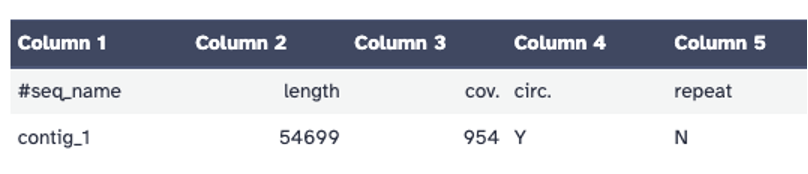
- Assembly info: length of contig(s), coverage (aim for 100-1000X), circular (yes or no), repeat (yes or no)
Bioinformatics
For the following steps, you will use the Flye software on Google Colab to assemble reads.
Genome Assembly with Flye using Google Colab
If more RAM is needed to run a genome assembly, Google Colab is a good option. The number of reads needed for a quality assembly of a phage genome will vary depending on the size of the genome and the length and quality of the reads. See sample fastq or fastq.gz data of phages BillyTP, Bhageatrice, and CabbageMan.
Genome assembly with Flye using Google Colab
-
Go to Google Colab.
-
Purchase compute units (if needed). Click on the down arrow (upper right), click ‘View resources’, and then click ‘Learn more’ to purchase more units.
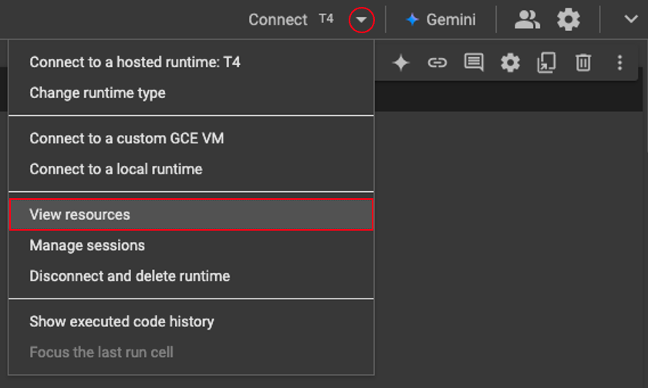
-
Click on ‘Connect’ (upper right) and select ‘T4 GPU’ under ‘Hardware accelerator.’
-
Add code or text by clicking ‘+ Code’ or ‘+ Text’, respectively. Connect notebook to Google Drive storage (optional); click play symbol to run code (~20 s).
from google.colab import drive drive.mount('/content/drive') -
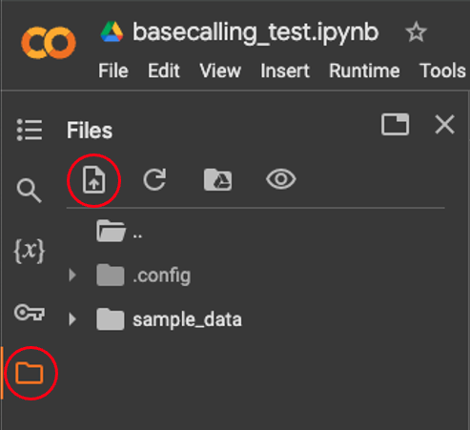
Upload ‘fastq.gz’ files. On left hand side of screen, click on the folder icon (Files) and then click on ‘Upload to session storage’ icon. NOTE: This data will not be saved and any outputs need to be saved if outputs are not directed to Google Drive.
-
Download Flye from github. Please see https://github.com/mikolmogorov/Flye to select the appropriate path as versions and instructions may change in the future. (linux-x64 is needed for Google Colab)
!wget https://github.com/fenderglass/Flye/archive/refs/tags/2.9.tar.gz -
Unzip file.
!tar -xzf /content/2.9.tar.gz -
Change directory to Flye
!cd Flye-2.9/ -
Build ‘setup.py’
!python3 /content/Flye-2.9/setup.py build -
Install ‘setup.py’
!python3 /content/Flye-2.9/setup.py install -
Run Flye. NOTE: If you uploaded your Google Drive, you can select the ‘fastq.gz’ files from your folder and direct the outputs to a Google Drive folder. You can also add your
.fastq.gzfiles one by one to the command instead of running all by*.fastq.gz. If the files are not gzipped, change the code to*.fastq.!flye --nano-hq *.fastq.gz --out-dir /content/sample_data --threads 4 --iterations 1 -
Important outputs to save. NOTE: Files will be deleted after the runtime stops.
- On screen: Total length, Fragments, Fragments N50, Largest fragment, Scaffolds, and Mean Coverage (aim for 100-1000X)
- In folder:
•assembly.fasta: contains contigs in fasta format
•assembly_info.txt: contains contig number, length (bp), mean coverage , circular (yes/no), repeat (yes/no)
-
Optional: Other options to run
!flye --helpPhage Contig size (bp) Coverage circular (Y/N) BillyTP 53,003 710X yes Bhageatrice 54,699 954X yes Genome assembly summary information for phages BillyTP and Bhageatrice. The Nanopore assembly of BillyTP only varied by one base pair when compared to the Illumina assembly (GenBank Accession number: PP978841.1). This variation is likely due to a “growth” mutation and not sequencing or assembly error. The Nanopore assembly of Bhageatrice was 100% identical to the Illumina assembly that is available on the Actinobacteriophage Database at PhagesDB.org.
Comments and discussion
See recent comments or start a discussion on our Slack channel.